Forms
A form is a section of a document that allows the user to enter information for later processing by the system. On the HotList.biz platform, you can create full-fledged forms, with binding of names, id and class'ov for fields.
Form data can be sent not only to your site, but also to any third-party server. An autoresponder is available. In the form, you can specify the type of data to be sent, and the type of encoding, and labels for the buttons, and the text of messages in case of an error or successful processing, and specify a security image, and much more.
Form fields can be flexibly configured, check for compliance with the data type, mandatory filling, and much more.
In the form, you can poison any data, as well as files. When sending files, it is possible to use an array of data using a single object name. Such a function may be needed when creating a single field for attaching multiple files using JavaScript.
Как создать форму?
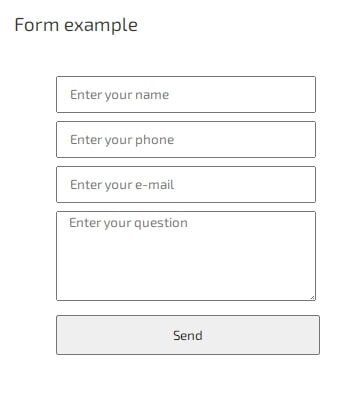
To quickly create a form with auto-completion of the main fields, as well as create a style for the form, use the button "Create a standard form "Callback", "Ask a question", etc.". This method will allow you to create fields with predefined names for the fields that are used to transfer data to sales statistics. You can select the languages of the created forms after clicking the quick form creation button. Styles for the form will be added automatically. You can change the styles in the "Design Editor", in the "CSS Styles" tab.How to edit a form?
In the "My Forms" section, you can see a list of all previously created forms. Click "Edit" to change the forms.For example, let's add a conversion code to a form. Open the form for editing. In the "Result Message" - "Success" section, add the conversion code, as well as the text that will be displayed to the buyer. For example, "Data sent successfully".
How to insert a form on the page?
The form is inserted using the short code "[FORM:XXX]", where XXX is the ID of the form.How to create a popup window with a form?

Full list of additional attributes when creating popup windows with forms:
Creating popup forms and instructions with attributesHow to create a Quick Order button?
Create a block/menu where you mark up the code:
$(document).ready(function() {

  let $l = $("meta[http-equiv='content-language']").attr("content");

  const translations = {
  ru: {
  quickOrder: "Быстрый заказ",
  order: "Заказать"
  },
  pl: {
  quickOrder: "Szybkie zamówienie",
  order: "Zamów"
  },
  en: {
  quickOrder: "Quick Order",
  order: "Order"
  },
  uk: {
  quickOrder: "Швидке замовлення",
  order: "Замовити"
  },
  fr: {
  quickOrder: "Commande rapide",
  order: "Commander"
  },
  de: {
  quickOrder: "Schnelle Bestellung",
  order: "Bestellen"
  },
  es: {
  quickOrder: "Pedido rápido",
  order: "Pedir"
  }
  };

  const lang = translations[$l] || translations.en;

  $(".hotengine-shop-product-desc-block .hotengine-shop-product-cart_icon").after(`
  <div class="button_quickorder hotengine-form-constructor"
  data-dialog-form_id="XXX"
  data-dialog-width="370"
  data-dialog-height="300"
  data-mobile-width="300"
  data-dialog-min-height="300"
  data-dialog-min-width="300"
  data-dialog-form_title="${lang.quickOrder}"
  data-dialog-title="${lang.quickOrder}"
  data-dialog-whatform="${lang.quickOrder}: ${$("#hotengine-content-shop .headh h1").text()}"
  data-dialog-modify-text=""
  data-dialog-buttontext="${lang.order}"
  data-dialog-productid="${$("#page_content .hotengine-marking").attr("data-hotengine-marking-shop_catalog_page_id")}"
  data-dialog-formprice="${$("#page_content .hotengine-marking[data-hotengine-marking-type='shop_catalog_page']").attr("data-hotengine-marking-shop_catalog_page_price")}"
  data-dialog-form-hide-fields=".my_form_form_text, .my_form_form_name, .my_form_form_email">
  ${lang.quickOrder}
  </div>
  `);
  });
XXX - ID of the previously created form.
Check the "JavaScript" box, so the code from the example above will automatically be saved to a file and cached by the browser to speed up loading. If the checkbox is not checked, be sure to add the tag <script>CODE</script>
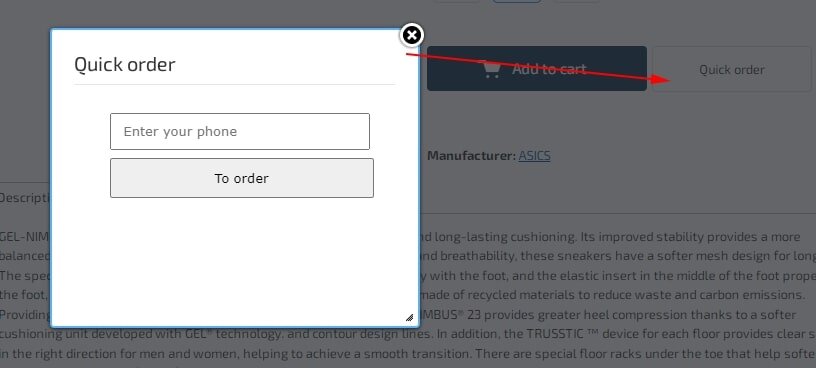
In this example, the name for the pop-up window is specified, as well as the transfer of data about the product in which the click is made. The code will add a button after the ".hotengine-shop-product-desc-block .hotengine-shop-product-cart_icon" element - the "Add to Cart" button. The class that calls the popup button is "hotengine-form-constructor". Additionally, for the subsequent creation of the style of the button, the class "button_quickorder" is added.
You can style the button in the Design Editor, in the CSS Styles tab.
For example:
.button_quickorder{display:inline-block;
text-decoration:none;
background:#FFFFFF;
padding:0px;
line-height:44px;
white-space:nowrap;
text-align:center;
height:auto;
margin:5px;
width:160px;
border:1px solid #dedede;
cursor:pointer;
-moz-border-radius:4px;
-webkit-border-radius:4px;
border-radius:4px;
}
You can hide required fields after the popup form has been called ("data-dialog-form-hide-fields" parameter), enable required fields ("data-dialog-form-required-class" parameter), and even enable automatic form submission ( parameter "data-dialog-form-autosubmit").
Как создать поле и кнопку для автоотправки данных в форму?
You can add an <input> element to populate it without first calling the pop-up window, and auto-submit the form using the data from this element using additional parameters: "data-dialog-form-autosubmit", "data-dialog- form-required-class","data-dialog-form-autosubmit-replace-class","data-dialog-form-required-class-alert".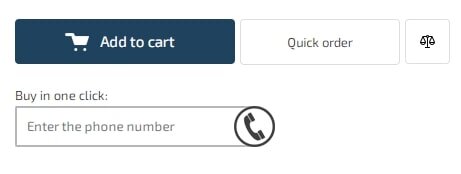
Example.
$(document).ready(function() {
  let $l = $("meta[http-equiv='content-language']").attr("content");
 const translations = {
  ru: {
  callbackPlaceholder: "Введите номер телефона",
  quickOrder: "Заказ в один клик",
  order: "Отправить",
  quickOrderText: "Быстрый заказ",
  enterPhoneAlert: "Введите ваш номер телефона"
  },
  pl: {
  callbackPlaceholder: "Wprowadź numer telefonu",
  quickOrder: "Zamówienie jednym kliknięciem",
  order: "Wyślij",
  quickOrderText: "Szybkie zamówienie",
  enterPhoneAlert: "Wprowadź swój numer telefonu"
  },
  en: {
  callbackPlaceholder: "Enter phone number",
  quickOrder: "One-click order",
  order: "Send",
  quickOrderText: "Quick order",
  enterPhoneAlert: "Enter your phone number"
  },
  uk: {
  callbackPlaceholder: "Введіть номер телефону",
  quickOrder: "Замовлення в один клік",
  order: "Відправити",
  quickOrderText: "Швидке замовлення",
  enterPhoneAlert: "Введіть ваш номер телефону"
  },
  fr: {
  callbackPlaceholder: "Entrez le numéro de téléphone",
  quickOrder: "Commande en un clic",
  order: "Envoyer",
  quickOrderText: "Commande rapide",
  enterPhoneAlert: "Entrez votre numéro de téléphone"
  },
  de: {
  callbackPlaceholder: "Geben Sie die Telefonnummer ein",
  quickOrder: "Bestellung mit einem Klick",
  order: "Senden",
  quickOrderText: "Schnelle Bestellung",
  enterPhoneAlert: "Geben Sie Ihre Telefonnummer ein"
  },
  es: {
  callbackPlaceholder: "Introduce el número de teléfono",
  quickOrder: "Pedido en un clic",
  order: "Enviar",
  quickOrderText: "Pedido rápido",
  enterPhoneAlert: "Introduzca su número de teléfono"
  }
  };
 const lang = translations[$l] || translations.en;
 $(".hotengine-shop-product-desc-block .hotengine-shop-product-cart_icon").after(`
  <div class="button_callback_input">
  <input type="text" name="input_callback" class="input_callback" placeholder="${lang.callbackPlaceholder}">
  <div class="button_callback required_data_hotengine-form-constructor hotengine-form-constructor"
  data-dialog-form_id="<strong>XXX</strong>"
  data-dialog-width="370"
  data-dialog-height="250"
  data-mobile-width="300"
  data-dialog-min-width="300"
  data-dialog-form_title="${lang.quickOrder} ${$(".hotengine-shop-product-title").text()}"
  data-dialog-title="${lang.quickOrder}"
  data-dialog-whatform="${lang.quickOrderText} ${$(".hotengine-shop-product-title").text()}"
  data-dialog-modify-text=""
  data-dialog-buttontext="${lang.order}"
  data-dialog-varietyid="${$("#page_content .hotengine-shop-product-cart_icon").attr("data-variety")}"
  data-dialog-productid="${$("#page_content .hotengine-marking [data-hotengine-marking-type='shop_catalog_page']").attr("data-hotengine-marking-shop_catalog_page_id")}"
  data-dialog-formprice="${$("#page_content .hotengine-marking [data-hotengine-marking-type='shop_catalog_page']").attr("data-hotengine-marking-shop_catalog_page_price")}"
  data-dialog-form-autosubmit="1"
  data-dialog-form-required-class=".input_callback"
  data-dialog-form-autosubmit-replace-class=".form_phone"
  data-dialog-form-required-class-alert="${lang.enterPhoneAlert}"
  data-dialog-form-hide-fields="<strong>.my_form_form_text, .my_form_form_name, .my_form_form_email</strong>">
  </div>
  </div>
  `);
  });
XXX - ID of the previously created form.
You can style the button in the Design Editor, in the CSS Styles tab.
For example:
  .hotengine-shop-product-desc-block .button_callback_input {
  vertical-align:top;
  display: inline-block;
  text-align:left;
  line-height: 22px;
  width:97%; max-width:260px;
  position:relative;
  margin:5px 10px 20px 0px;
  -webkit-border-radius: 24px;
  -webkit-border-top-left-radius: 2px;
  -webkit-border-bottom-left-radius: 2px;
  -moz-border-radius: 24px;
  -moz-border-radius-topleft: 2px;
  -moz-border-radius-bottomleft: 2px;
  border-radius: 24px;
  border-top-left-radius: 2px;
  border-bottom-left-radius: 2px;
}
  .hotengine-shop-product-desc-block .button_callback_input input {  line-height: 31px;  padding: 5px 0px;
  -webkit-border-radius: 24px;
  -webkit-border-top-left-radius: 2px;
  -webkit-border-bottom-left-radius: 2px;
  -moz-border-radius: 24px;
  -moz-border-radius-topleft: 2px;
  -moz-border-radius-bottomleft: 2px;
  border-radius: 24px;
  border-top-left-radius: 2px;
  border-bottom-left-radius: 2px;
  text-indent:10px;
  width:100%;
  border: 2px solid #b7b7b7;
  vertical-align:top;
  }

.hotengine-shop-product-desc-block .button_callback{ background:#fff; border:2px solid #b7b7b7; border-radius:50%; position:absolute; right:0px; top: 0px; width:45px; height:45px; vertical-align:top;}
  .hotengine-shop-product-desc-block .button_callback:after {  width:45px; height:45px; content:""; background:#555; display:inline-block;  position:absolute; left:-1px; top:-1px; -webkit-mask:url("/templates/styles/shop_callback_icon/button_callback.svg") no-repeat center center;  -webkit-mask-size:29px;  cursor:pointer;}
  .hotengine-shop-product-desc-block .button_callback:active { top:1px;}