- blog.hotlist.biz
- Step-by-step instructions for creating an online store with a search filter and a mobile version
Step-by-step instructions for creating an online store with a search filter and a mobile version
Let's consider an example of creating an online store with categories, search filters, tabs in descriptions, mobile version, choice of payment and delivery methods.
Template installation.
Control panel.
Categories.
Products. Adding and managing.
Search filter.
Main menu.
Mobile Menu Widget: Application.
Widgets: Category and product list generator.
Delivery and payment. Currencies. Delivery information.
How to import products? CSV/XLS/XML
How to create a multilingual website
How to change Contacts on the site?
Design editor.
Layout and Block creation. Custom design.
Notifications and sales statistics.
Domain Parking
Installing a template.
First you need to select a template (graphic design and styles for the site). This can be done by filling out the form «Site creation». For «universal templates» you can change the Color scheme, Background image of the site and headers, Set a logo, Change the style of the main menu and Colors of elements, as well as specify your own CSS styles for any elements. All this can be done in the «Site Design» section - «Design Editor».
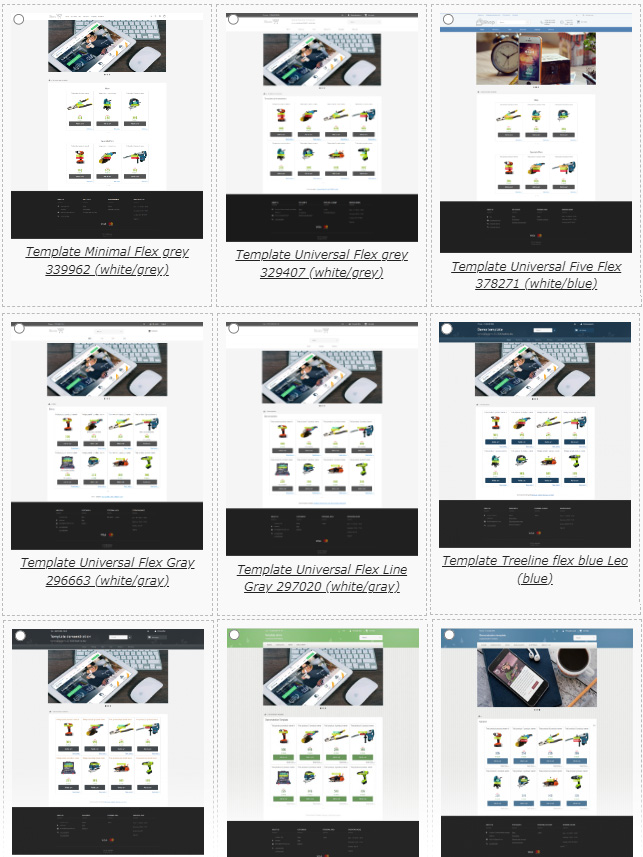
If you have not installed the template, you can do so later by opening «Template Catalog" or by creating an individual design yourself (creating Blocks/Menus with HTML code and placing CSS styles in the «Design Editor»).
Control Panel.
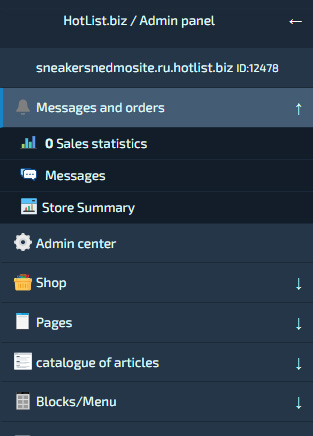
The control panel («Admin Panel») is located on the left (or at the top in the «Mobile version»).
Editor.
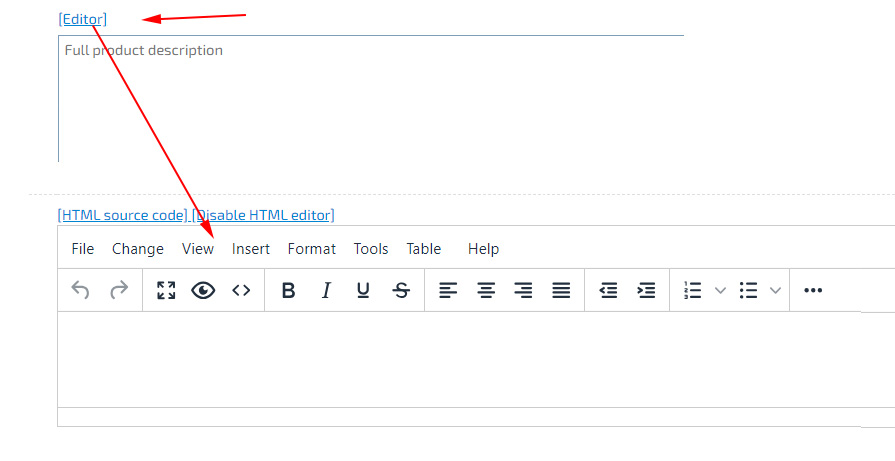
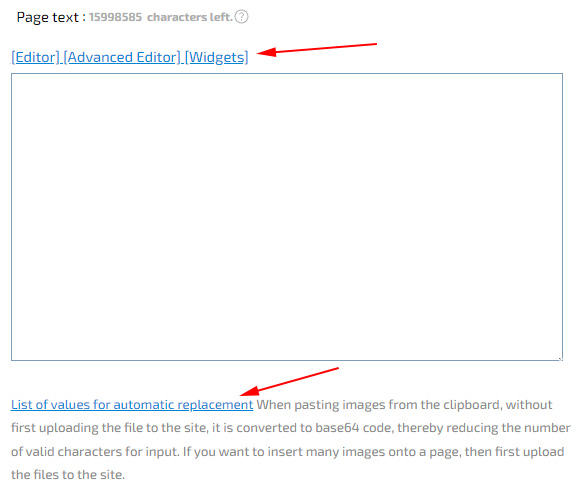
All text data on the site can be inserted using the built-in editor. To enable it, click on the «[Editor]» link, which is located above the block for inserting text (pages, blocks/menus, product descriptions and others).
Categories
To create a clear structure for your Product Catalog, add «Store Categories». This can be done in the «Store» - «Store Categories» - «Add Category» section.
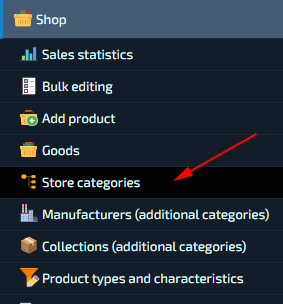
For easy navigation around the site, first create the main category «Store», in the «Main» category in the language you need. You will be able to specify all the necessary SEO headers (data for search engine promotion), as well as automatically added data. When installing the Template for the first time, parent categories «Store» are automatically created in all selected Languages. If the button text is not specified, it will be replaced by the «Title» of the category.
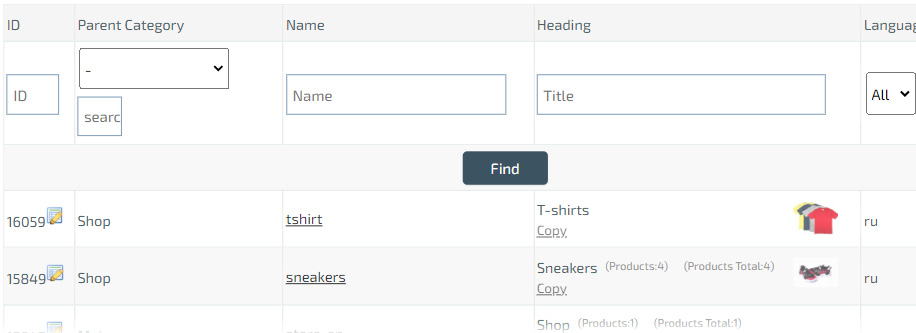
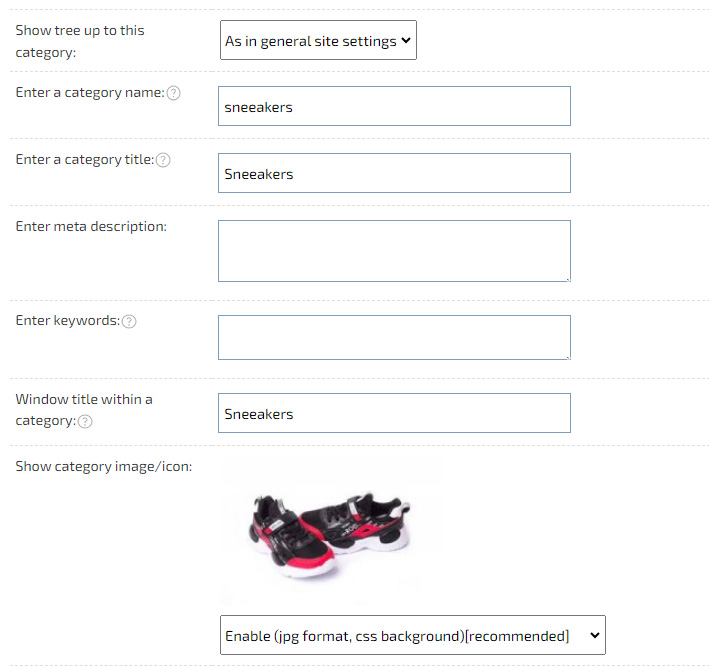
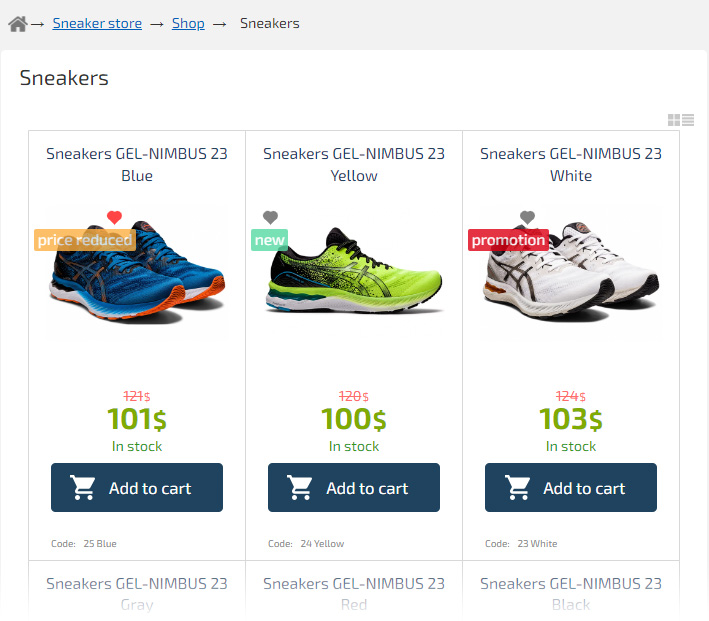
You can upload an icon to categories, and also display the «Number of embedded product cards» (in our example, the number of sneakers).
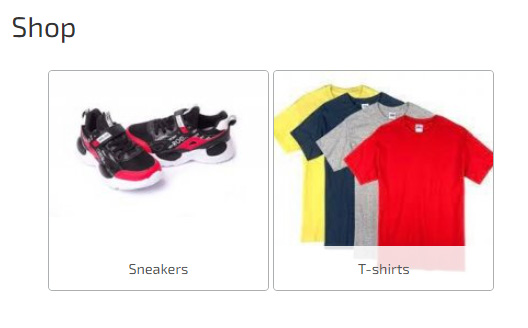
To create a clear structure, do not forget to insert child headings inside the parent ones, as well as the main sections into the «Store» heading. For example, we added «Sneakers» to the «Shop» section. For the buyer in the «Category Tree» the path will be «Store» → "Sneakers". Similarly, you can create more attachments, for example, «Store» → "Shoes" → "Sneakers."
How to import Categories?
Go to the «Store» - «Import Store Categories» section and follow the instructions on this page. You can also use Quick Import. Which allows you to quickly add categories by inserting values as text. For example, let's perform a quick import. Go to the «Store» - «Store Categories» - «Quick Import» section. Insert the text values of the added categories on a new line, which can be copied from EXCEL or entered manually. The delimiter is either "Tab" or the "|" character.
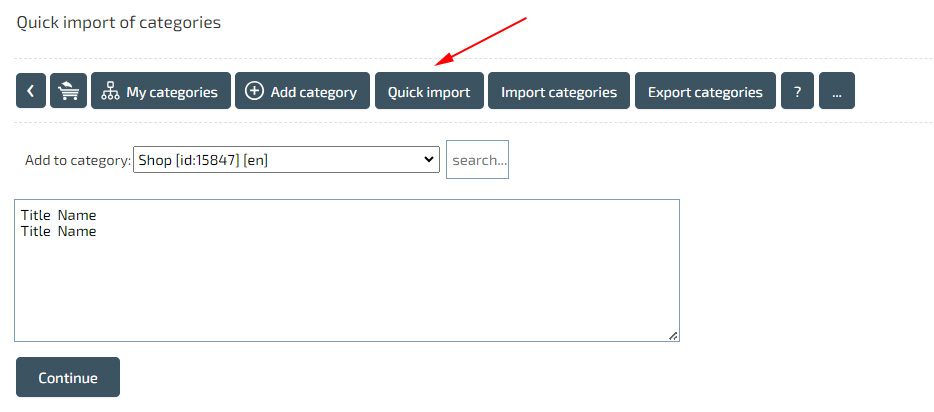
Click continue and specify the parent category into which the new category will be added. Save your changes.

Products.
Now you can add products to the created categories.
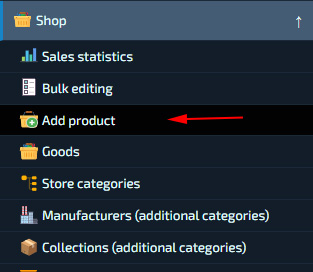
This can be done in the «Store» - «Add Product» section.
Fill in all the required information, such as «Name», «Price», «Category», «Product Image» and «Description». To add a «Product Card», you must specify «Name». You can find out all additional instructions on the product adding page by clicking on the «?» -
It is recommended to add a product to a category you created, for example «Store» → «Sneakers», this will help create a clear structure for your store.
Product Management.
You can manage all products in the «Store» - «Products» section.
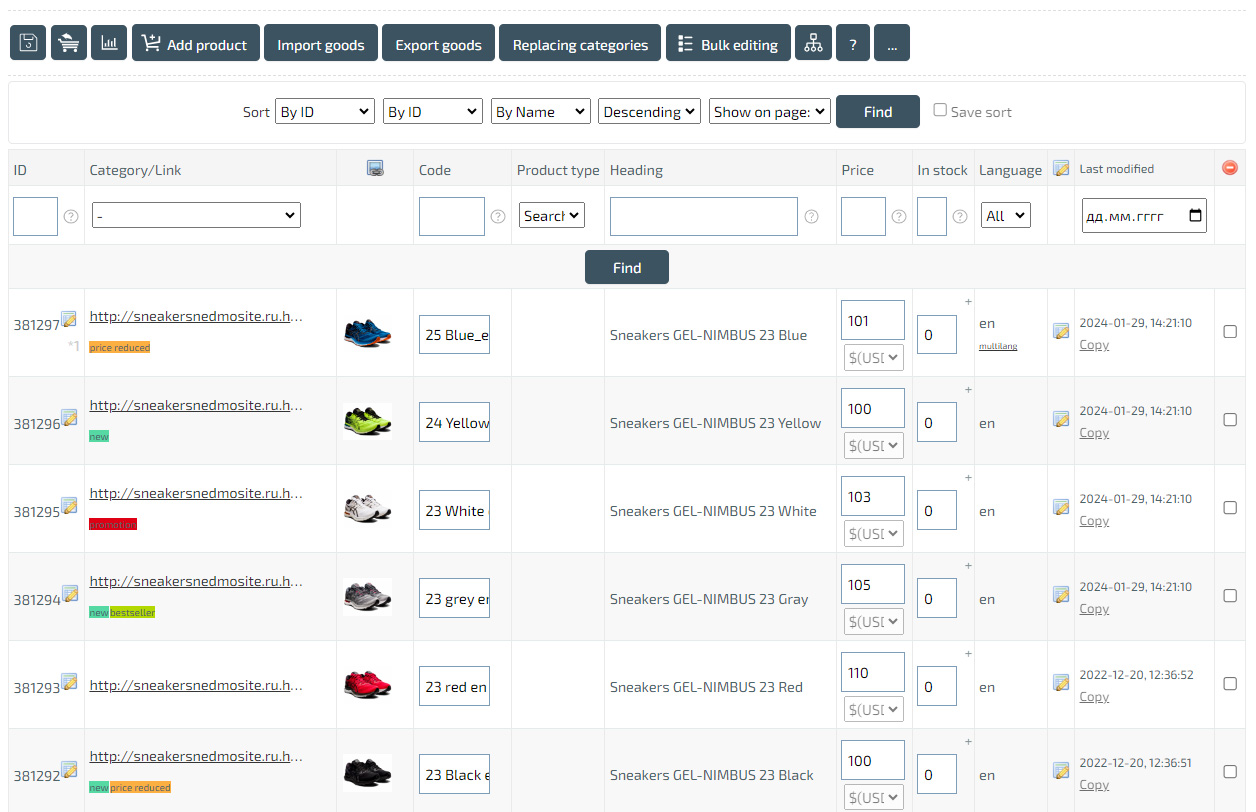
On the «My Products» page, you can quickly search for a product by «Header», «Article» and other data, as well as quickly replace some data, such as «Category», «Price», «Availability», «Removal» " You can edit more fields in the «Group Editing» section. And to quickly replace «All data», «Import/Export» of all fields of product cards has been implemented in the «Store» section, in the «Admin Panel».
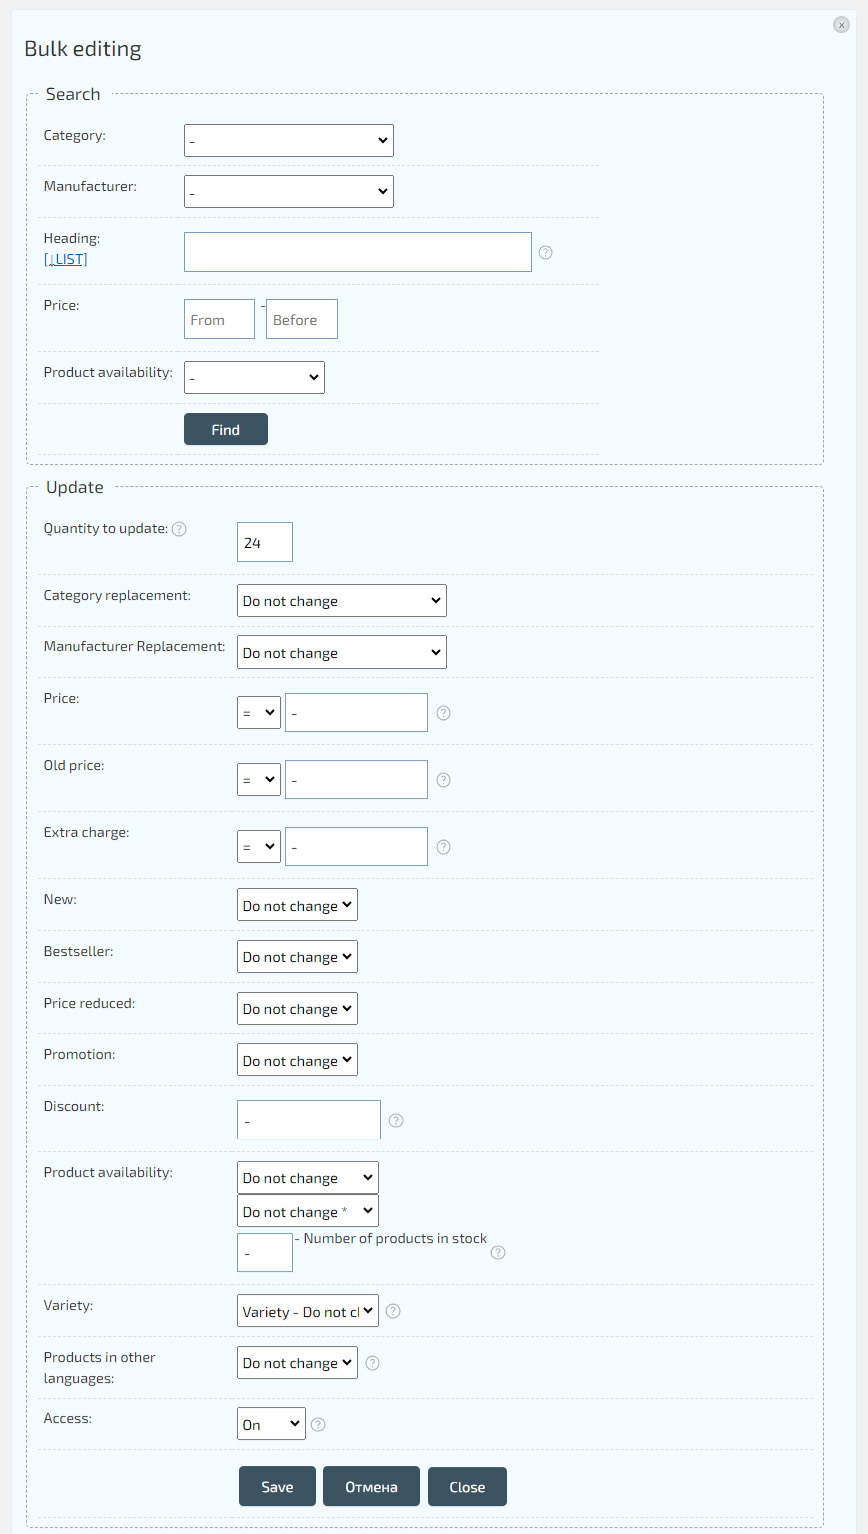
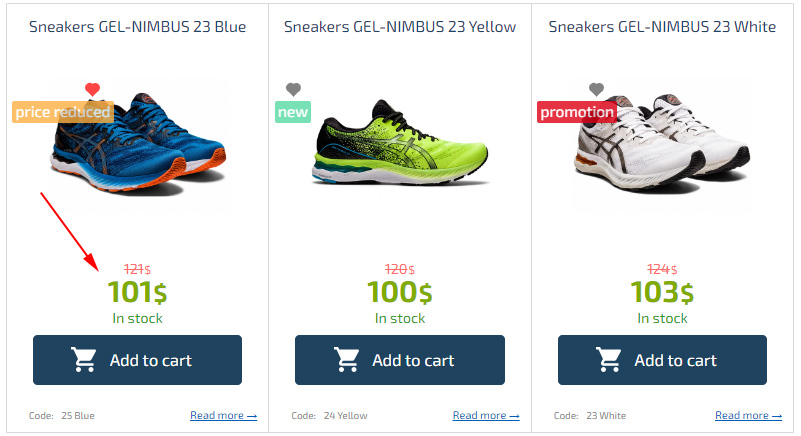
«Group editing» allows you to change «Category», «Availability», «Price», «Old price», «Indicate promotions» (including the timer), as well as search by «Title» and «Category» . The price can be changed by «Mathematical expression» - multiplication, division, addition, subtraction, including percentages. The «old price» can be indicated based on the cost of the product, also by «Mathematical expression». «Availability» can be indicated either as a number or as a «mathematical expression»: «+X» «-X». You can search for items to edit by «Name», «SKU», or «ID» by clicking «Title» - «[↓LIST]» in the group editor. Enter the list of items to modify, starting on a new line, and click «Search». In addition to editing the listed parameters, you can also modify «Access» and delete unnecessary product cards.
Tabs and product descriptions.
In product cards, you can specify the location of elements («Title», «Descriptions», «Add to cart buttons», «Varieties», «Images»). This can be done in the Design Editor. The product description can be inserted either into a separate block or into tabs. If you want to use «Tabs», then when adding products, go to «Title and Description», and fill out the «Description Tabs».
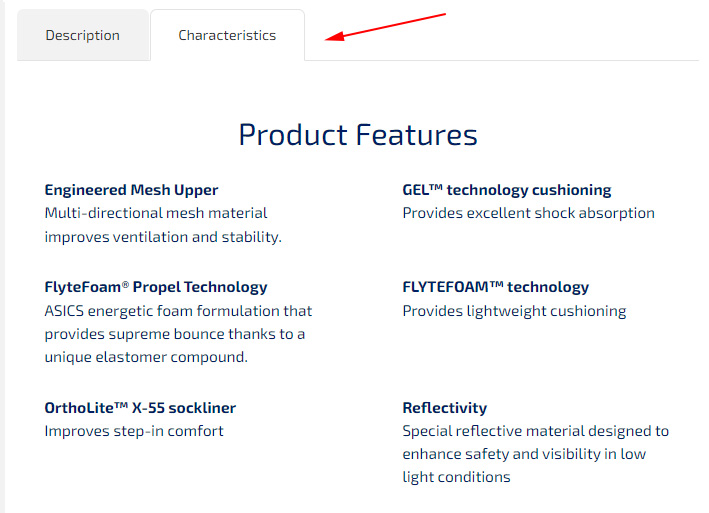
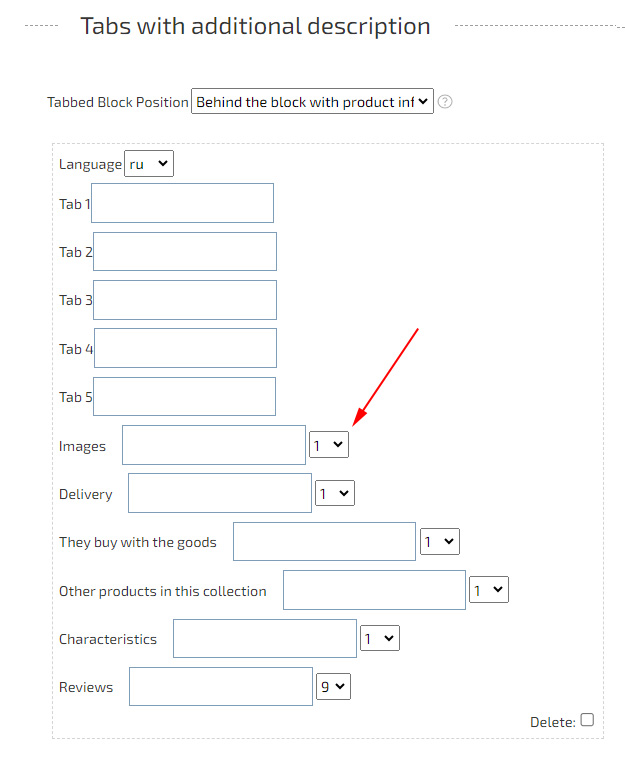
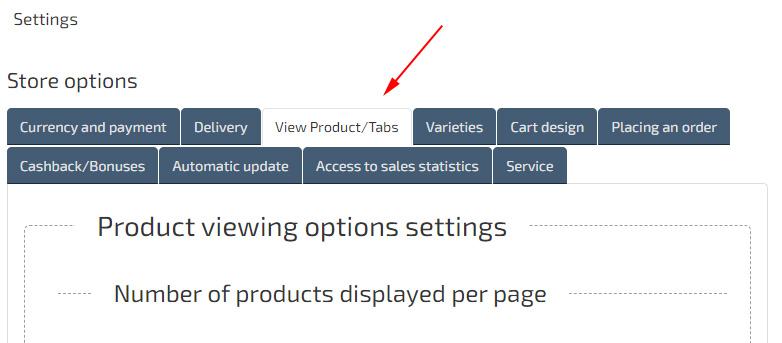
Tabs can be renamed. To do this, go to «Settings», to the «Store» tab - «View product/Tabs».
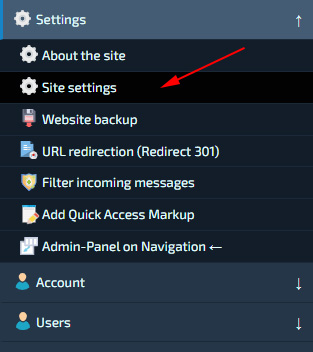
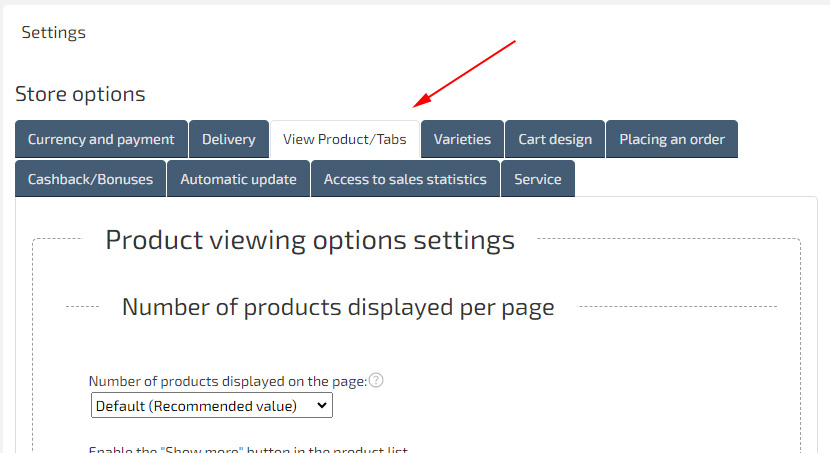
In the «Tabs with additional description» item, click «Add tab language», specify the required translation language and fill in the names of the tabs.
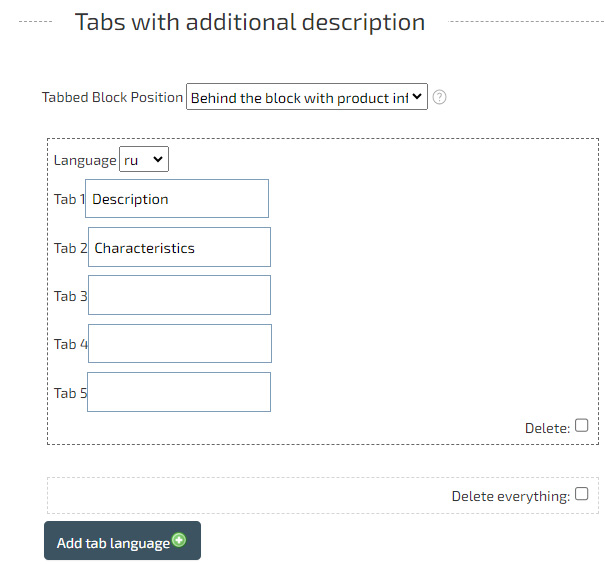
Five tabs are available, as well as additional built-in tabs, such as: «Reviews», «Characteristics», «Images», «Buy with the product», «Other products in this collection».
The order of the tabs is according to their numbering, «Tab 1», «Tab 2» and so on. And for «Additional tabs» you can specify the display order - in number from smallest to largest.
Varieties of goods.
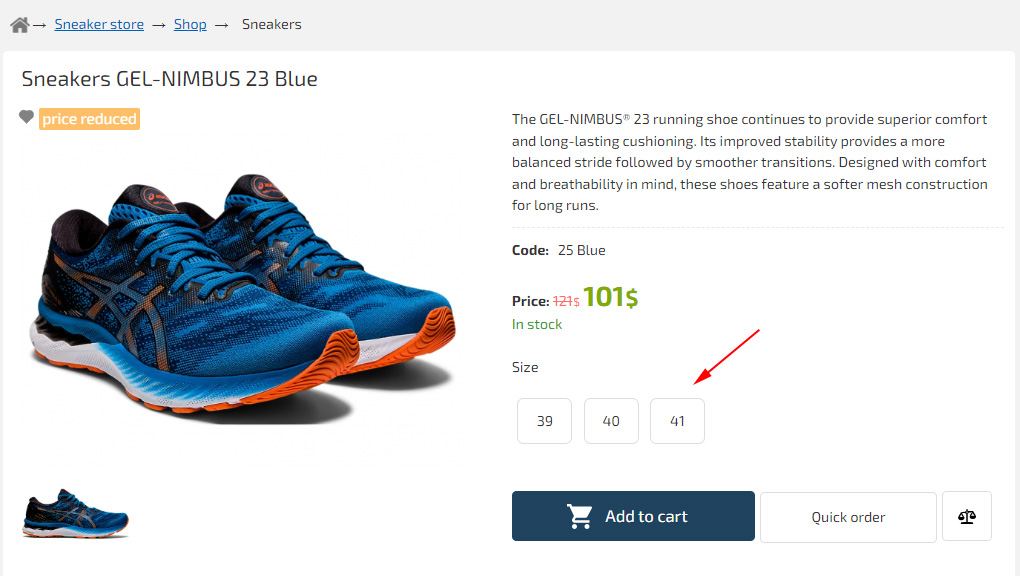
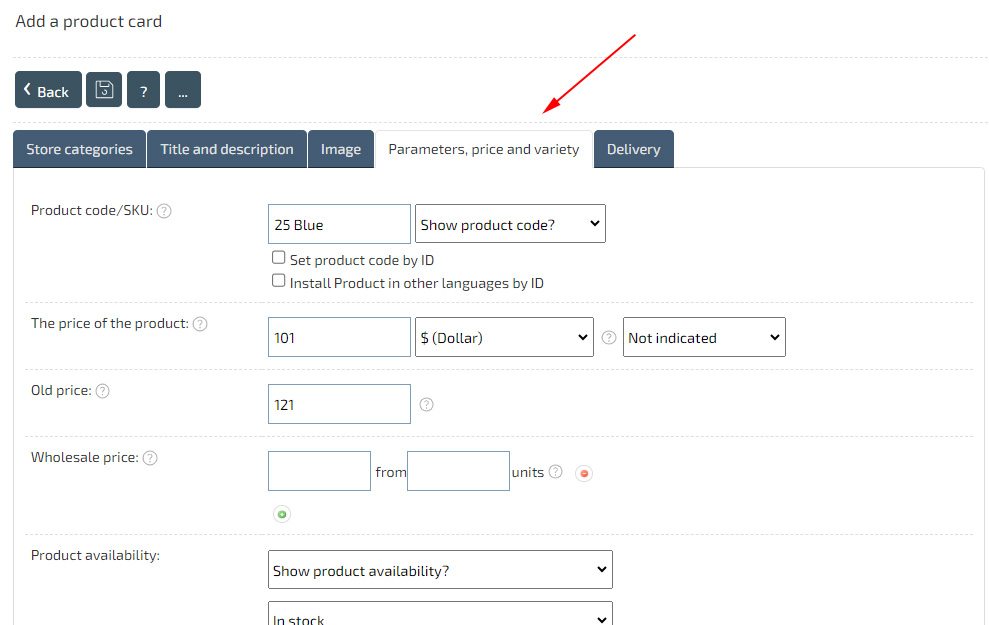
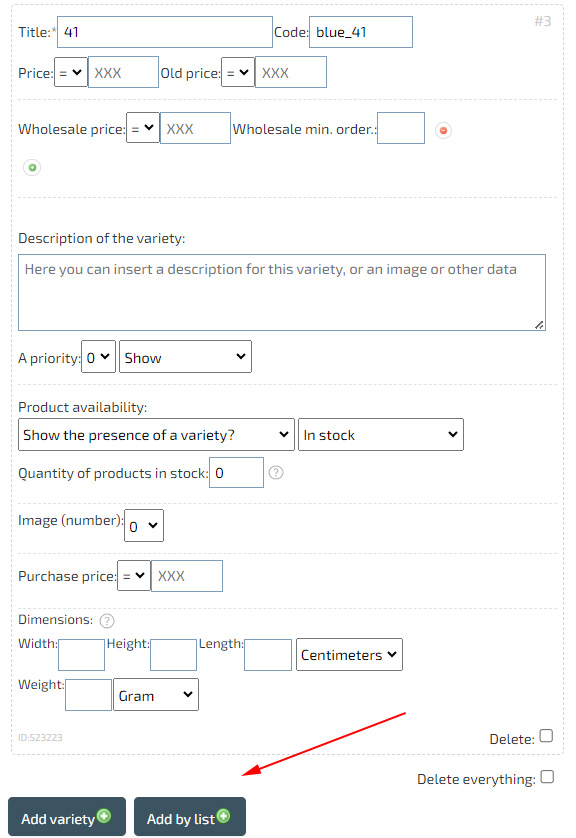
To add product varieties (for example, «size» or «color»), in the product card editor, go to the «Varieties» tab. And add variety values.
The style of display of varieties is specified in the settings, in the «Store», «Varieties» tab. Available display in the form of «Individual buttons», «Pop-up windows», «Drop-down list», «Each type with a separate add to cart button».
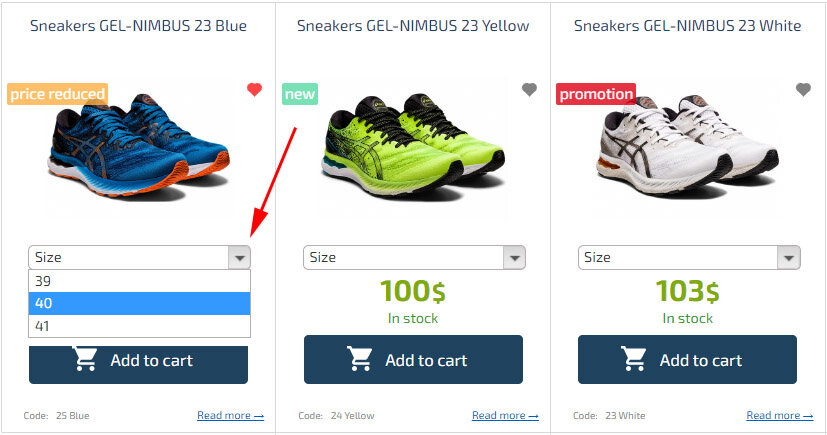
In addition, the variety selection button can be enabled when displaying a list of products. This can be done in the settings, in the «Store», «Varieties» tab, after paying for hosting with extended uploading.
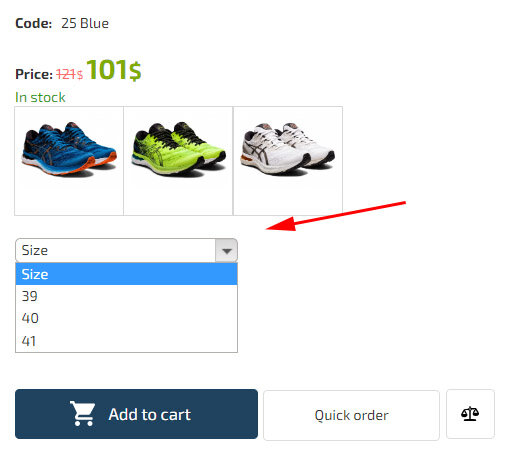
You can use your own descriptions, prices, articles, and images in the varieties. You can specify any variety options, and also, if you need to separate products by size and color, you can use the «Synonymous Products» item.
Synonymous products.
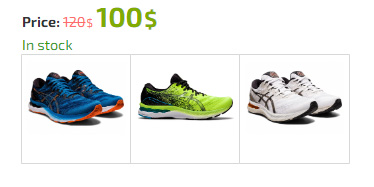
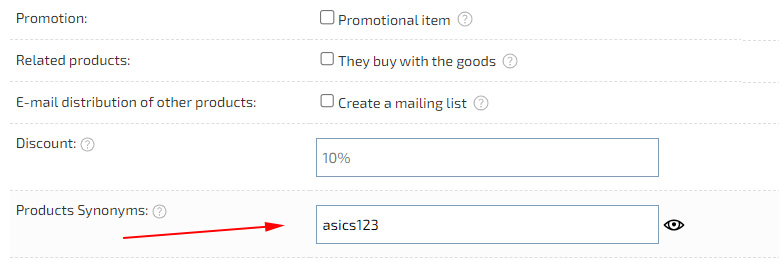
To display a switch from one product to other, similar products, for example, of different colors, you can use «Products synonyms». For example, for all sneakers of the same model of different colors, we will indicate the same values in the «Varieties» tab, in the «Products Synonyms» item, for example, «asics123».
Search filter.
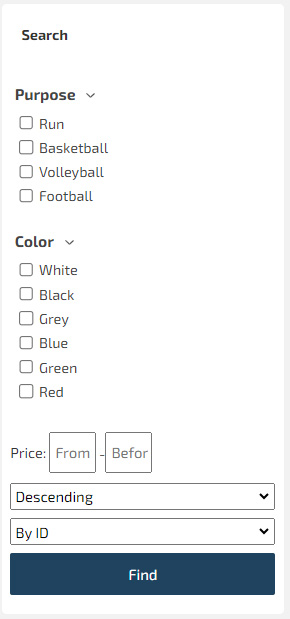
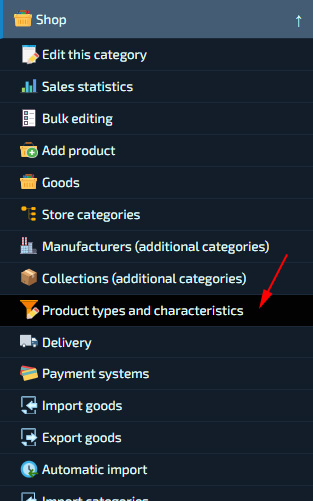
You can create a «Search filter» for different types of products and specify parameters in product cards. To do this, go to the «Store» section - «Product types and characteristics» and create a new «Product Type».
Add the required types of characteristics, as well as their values. For example, «Sneakers.»
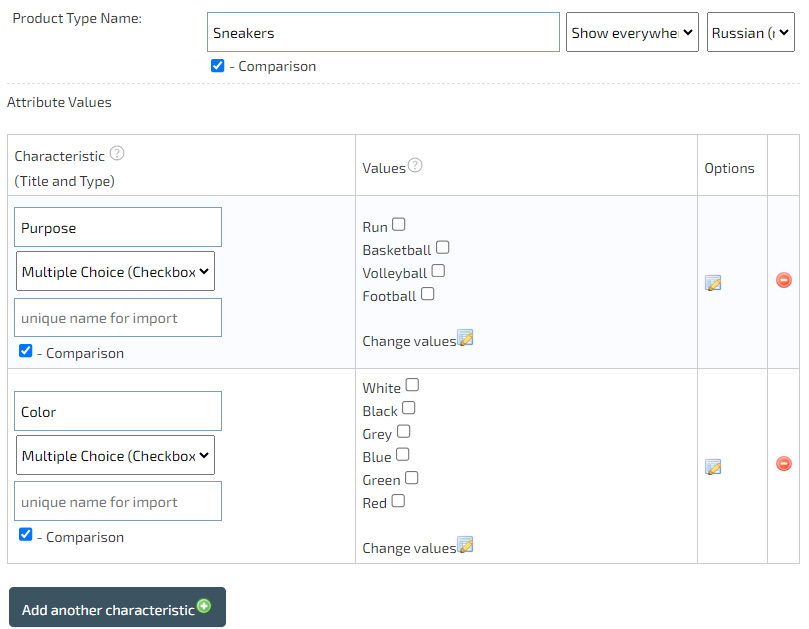
For example, Heading - «Purpose», Type - «Multiple Choice». Values: «Running», «Basketball», «Volleyball», «Football».
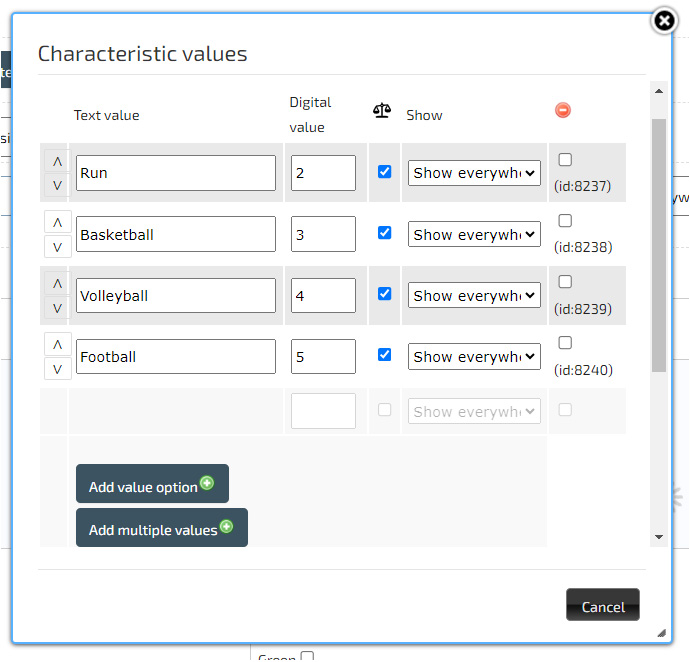
The resulting «product type ID» can be used to create a search filter block, for example, on the left side of the site.

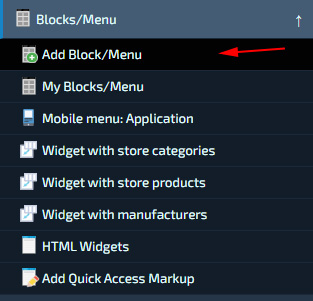
To create a «Search filter», click «My blocks/Menu» - «Add block/menu».
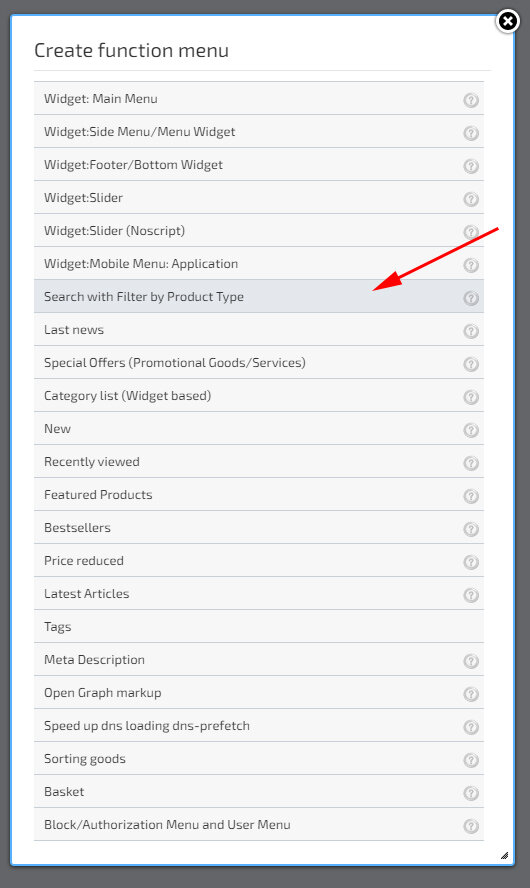
Select «Create Functional Menu» and click «Search with Filter by Product Type.»

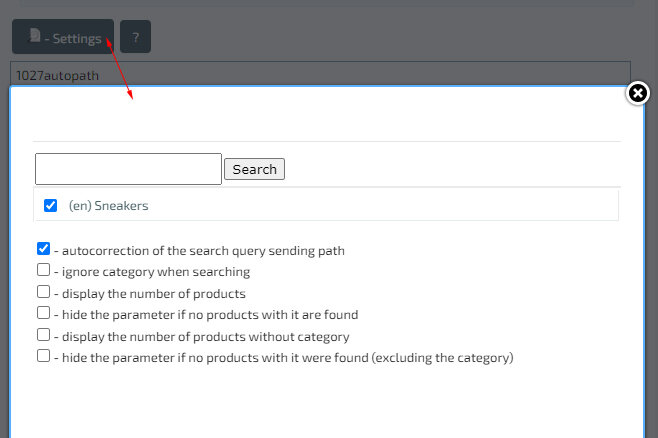
In the menu text, you can use the «autopath» parameter, which will indicate to the filter that the search must be carried out within the open «Category», as well as «Product Type ID», if you need to immediately place disclosures for the search for the product type. If the parameters are not specified, then the visitor will be able to select the required «product type» independently. In our example, we indicate the «Text of the block/menu» - «1027|autopath», where «1027» is the ID of the product type «Sneakers», and «autopath» is the search parameter on the same category page.

The position of the «Block/Menu» is on the left. We will also specify the parameter «Enter characters, when detected, display the Block/Menu» - «/en/pers_shop/sneakers», to display the search filter in expanded form, only on the «Sneakers» category page. You can find out the path of all your categories after they are created. If the «Search filter» needs to be hidden on the «Product Cards» page, then specify «.htm» in the «Enter characters that, if detected, will not display the Block/Menu.»
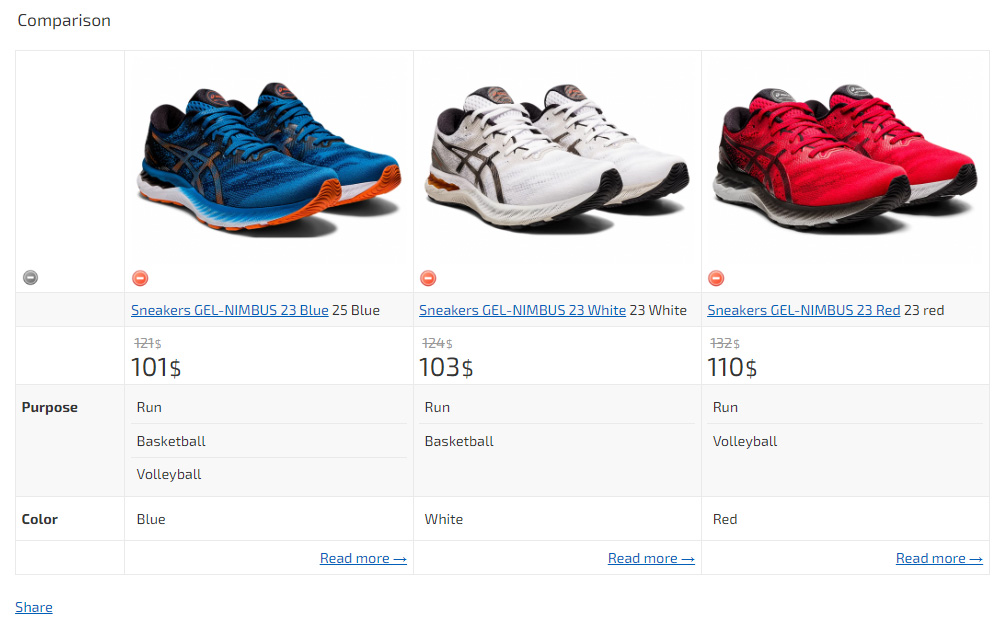
If you need to add a comparison, then when creating a product type and characteristic values, check the «Comparison» checkbox. After that, in «Settings», in the «Store» tab - «Product View/Tabs», turn on the «Product Comparison» item. To insert a button displaying the number of added products in comparison, use the short code «{HOTENGINE-SC:shop_compare_menu}», which can be placed, for example, in the site header*.
* - when using templates, this code is installed automatically and is activated only if product comparison is enabled.
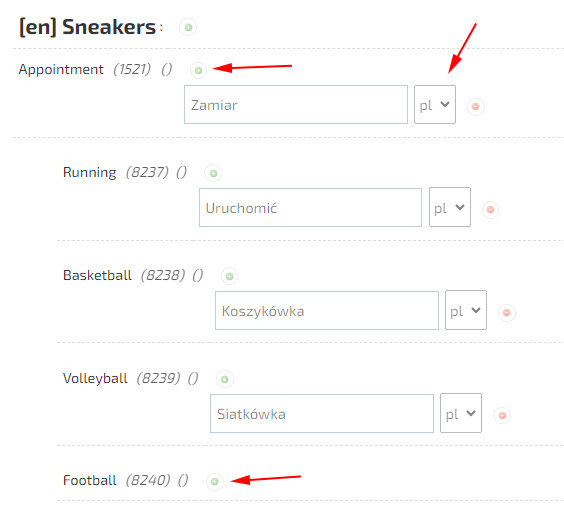
To translate the search filter into another language, there is no need to create another «Product Type». To translate «Product Types and Characteristics», the «Translation of Characteristic Values» function is available. The function is located on the page «Product types and characteristic values», «Translation of characteristic values».
Product characteristics.
After the «Product Types» have been created, you can specify «Product Characteristics». Go to the «Store» - «My Products» section, open the product card for editing and in the «Parameters and characteristics» tab, select the required «Product Type» and fill out the characteristics.
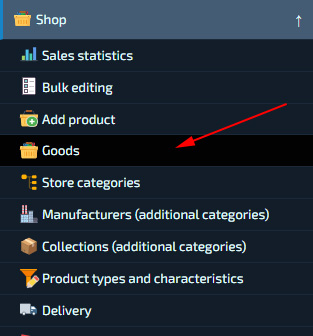
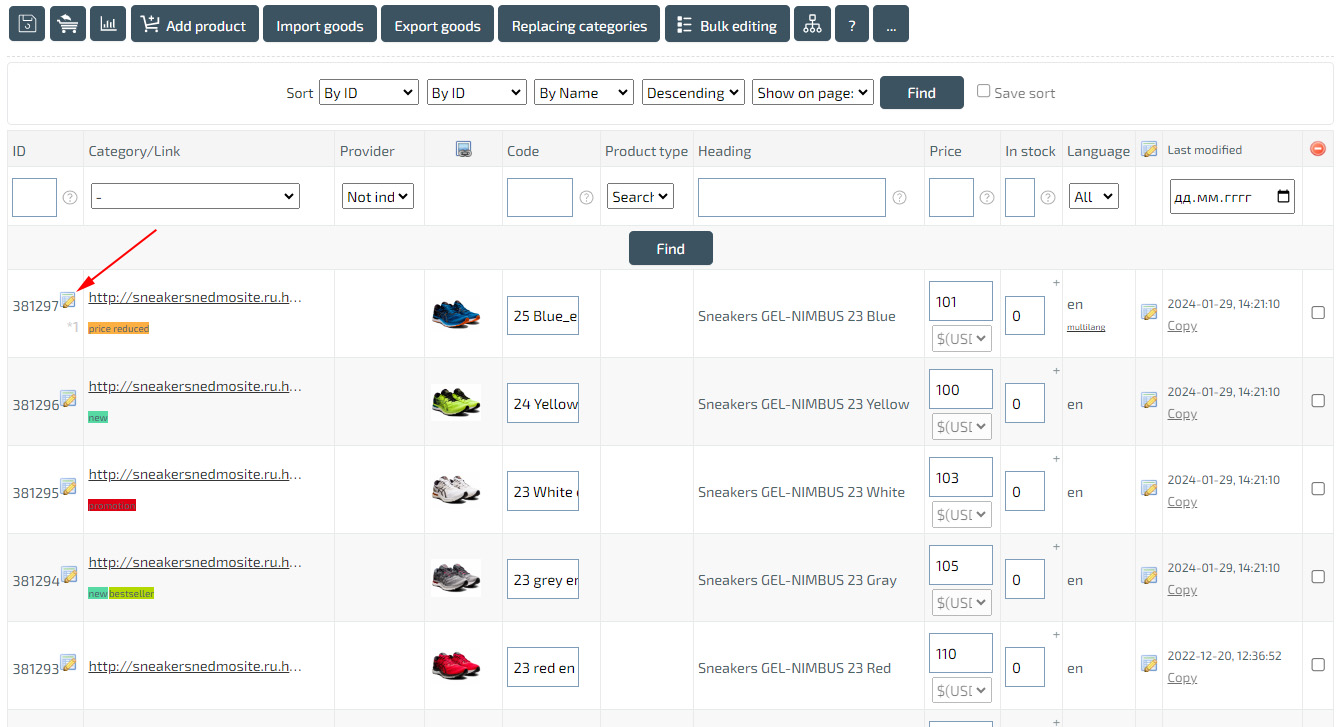
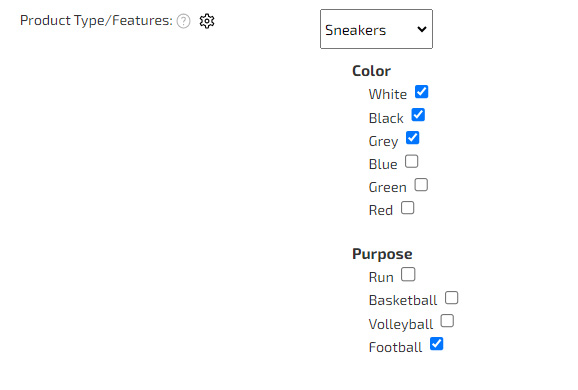
All product cards, as well as characteristics, can be imported in the «Store» - «Import products» section. To do this, first upload several trial products in the «Store» - «Export Products» section, checking the «Export Product Types and Characteristics» checkbox and use the created file as a template for uploading new or updating existing products.
Main menu.

To change the «Main Menu», go to «My Blocks/Menu», find (or create) a «Block/Menu» named «mainmenu» and click «Edit».
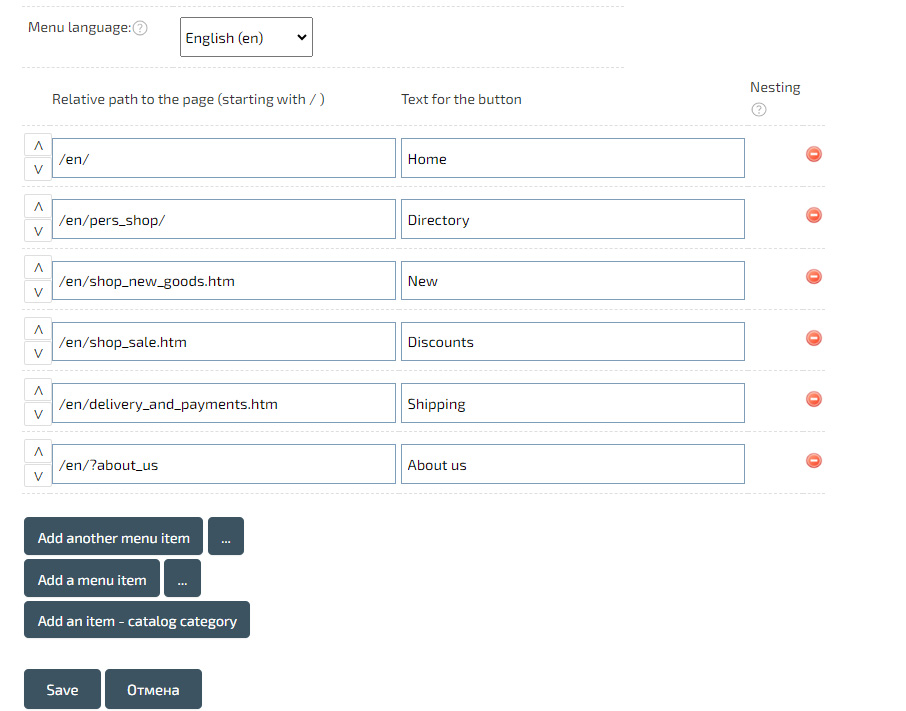
You can add the necessary links to pages and categories, change their order, or create a drop-down item with store categories.
We recommend using relative paths, for example, instead of «http://site.com/en/page.htm» use «/en/page.htm».
You can create a drop-down item with store categories by clicking «Add item - catalog category.»
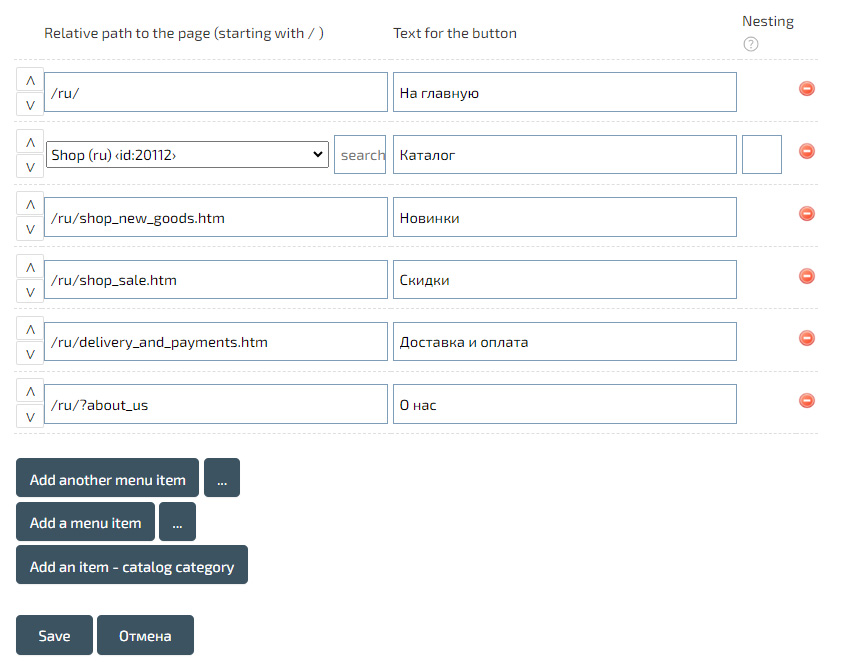
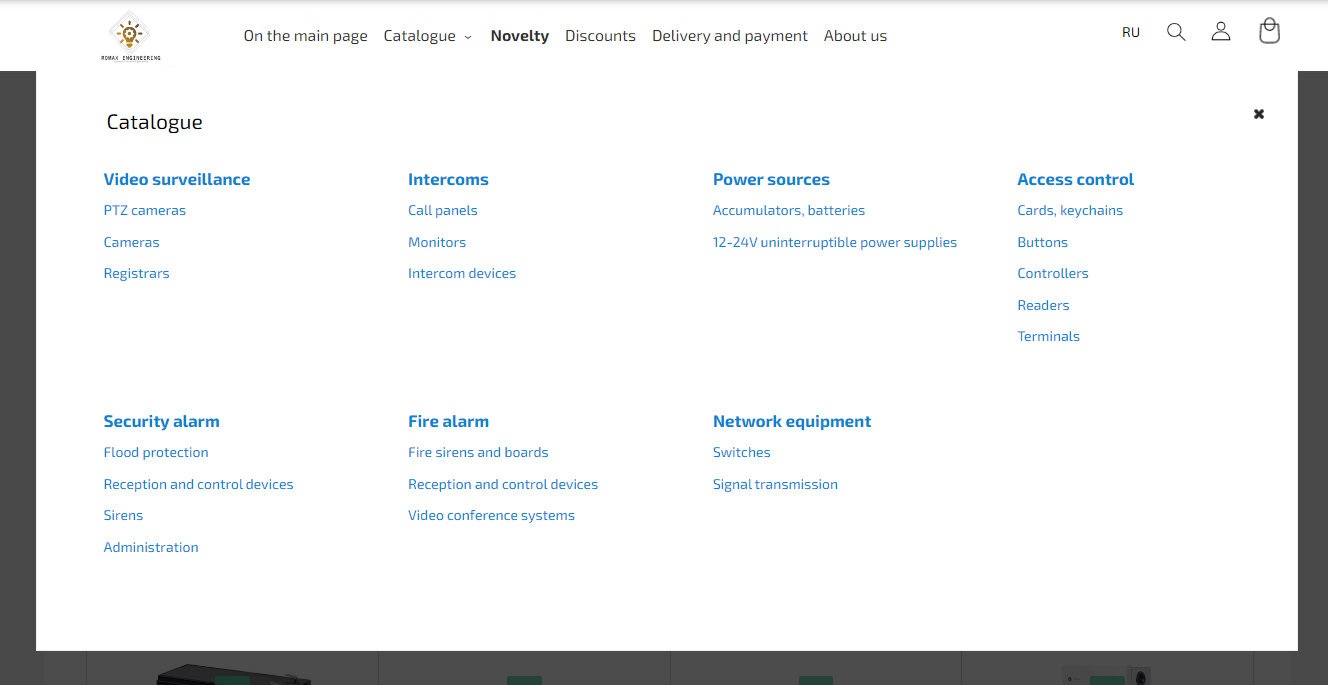
You can change the way the category drop-down list is displayed in the main menu. Option - «Drop-down list of categories» in the design editor or when changing the main menu, in the «My Blocks/Menu» section
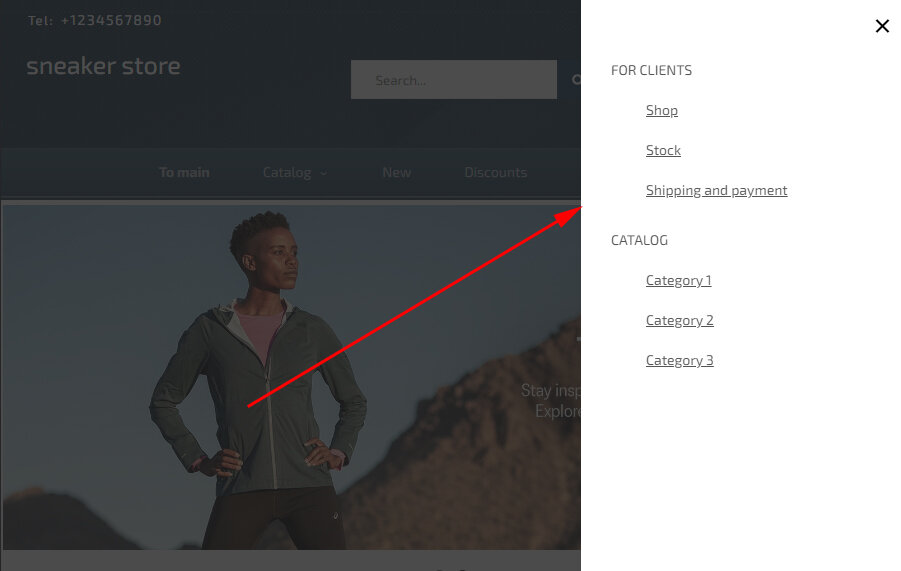
In addition, you can create a drop-down/pull-out menu with a separate button, for example, to display additional data on the right. This can be done using the widget (functional menu) «Widget:Side Menu/Widget with menu», which is created in the «My blocks/Menu» section
Mobile Menu Widget: Application.
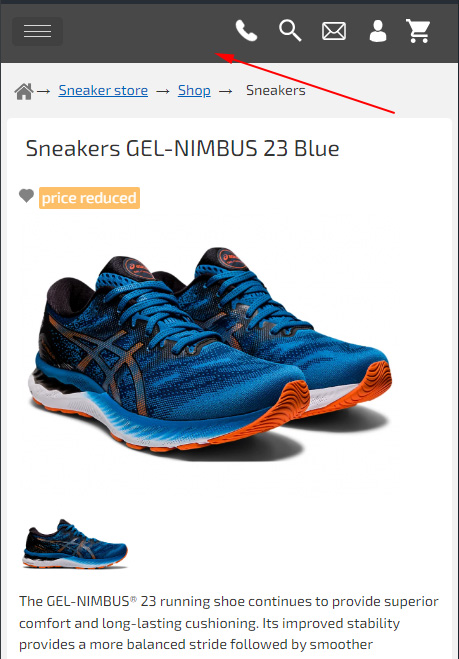
You can use the Mobile version editor to create a block with the icons and drop-down menu items you need.
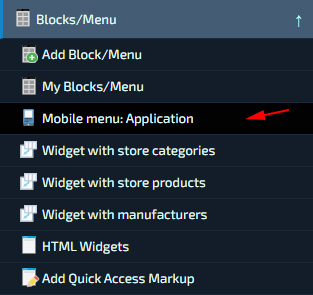
Open «My blocks/menu» - «Mobile Menu Widget: Application» and create a new block.
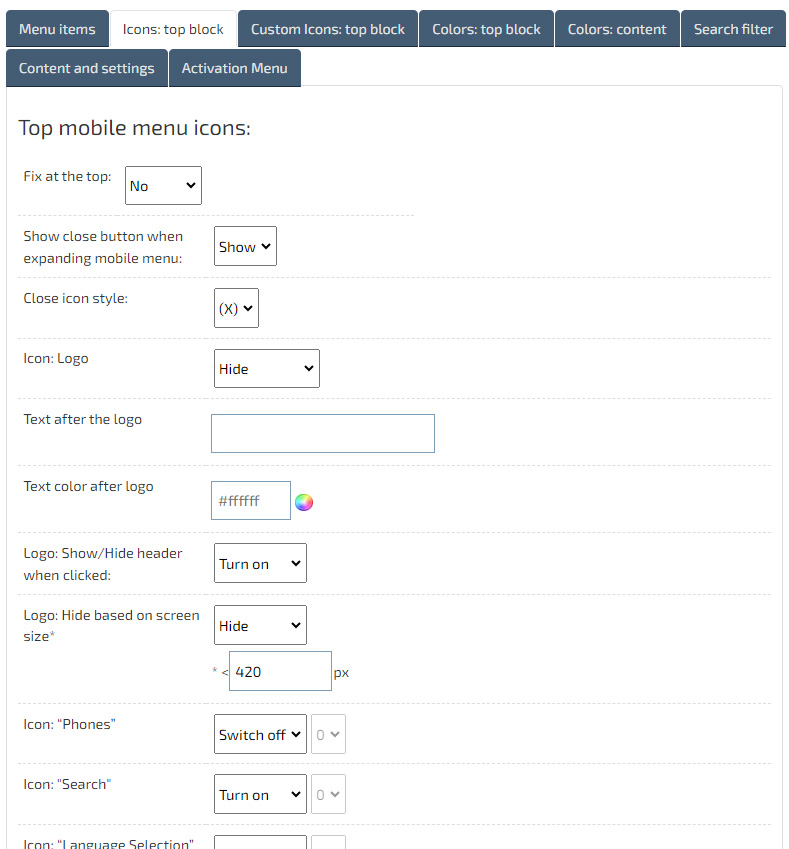
Specify the required icons. You can add to the menu automatic opening of the «Search Filter», loading of your own content of any page when clicked, as well as pop-up «Call Back» and «Feedback» forms. You can turn off the display of the «Header» and «Main Menu», and after adding the «Mobile Menu: Applications», we recommend turning off the standard «Mobile Button» in the «Design Editor» in the «Main Menu» tab.
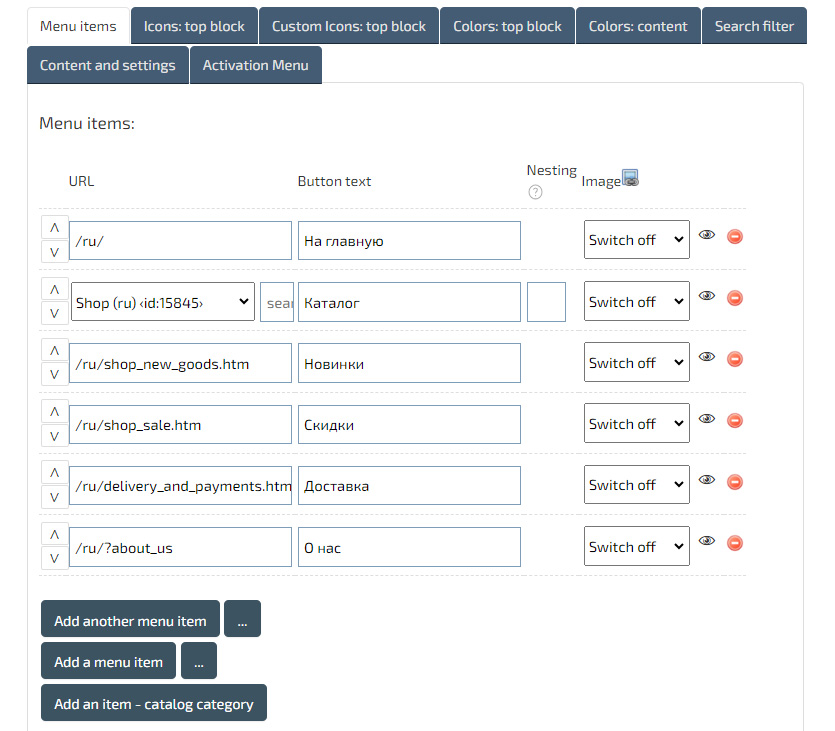
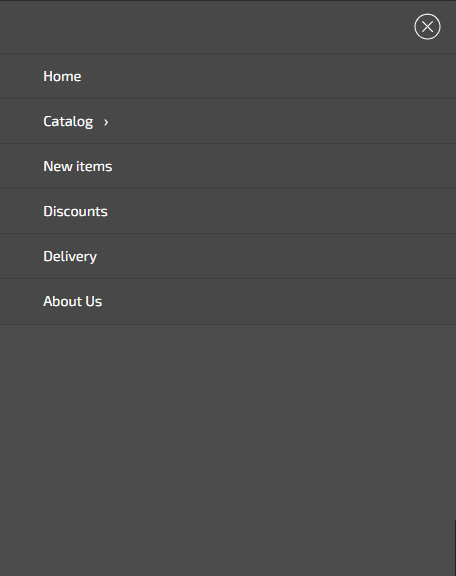
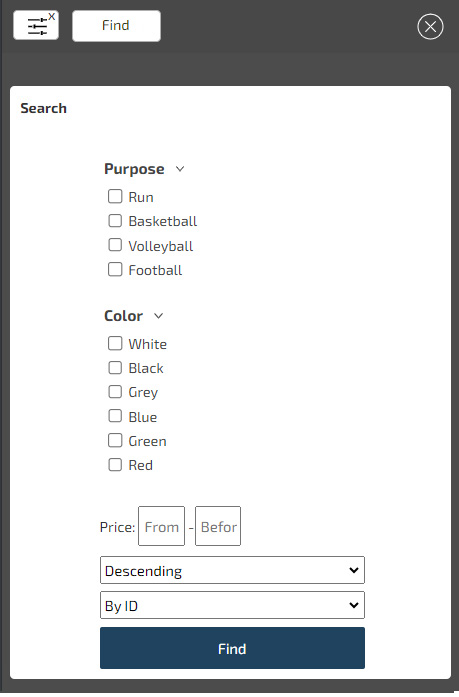
Follow the instructions on the «Mobile Menu: Application» page. For example, let's add a drop-down «Search filter» to the Mobile menu item. To do this, in the «Mobile Block/Menu Editor» in the «Menu Items» tab, add the path «/en/pers_shop/sneeakers/#filter». We specified the path to the «sneeakers» category, and also added the «#filter» hash tag, which opens the search filter. In this case, the «Search filter» must exist on the page being opened.
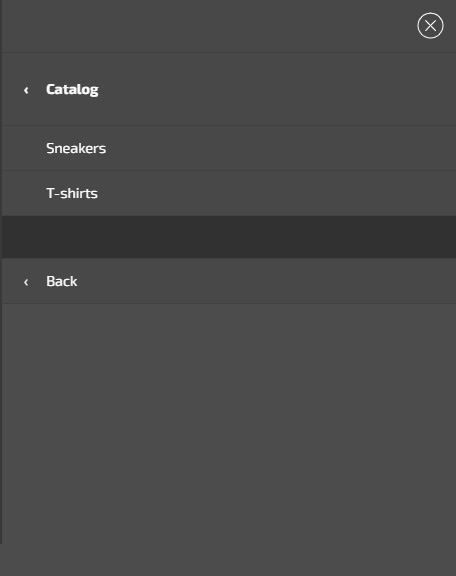
In addition, you can add a «Store Categories» item when navigating to which child categories will open («Add an item - catalog category»).
The mobile menu can be activated depending on the screen size or by pressing a button. More details in the «Mobile Menu: Application» section, «Menu Activation» Tab. You can set icons for menu items and change the style.
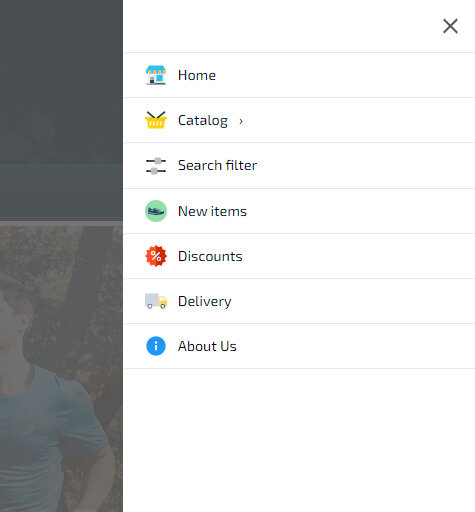
To add a «Call Back» or «Feedback» icon, you need to create a «Form».
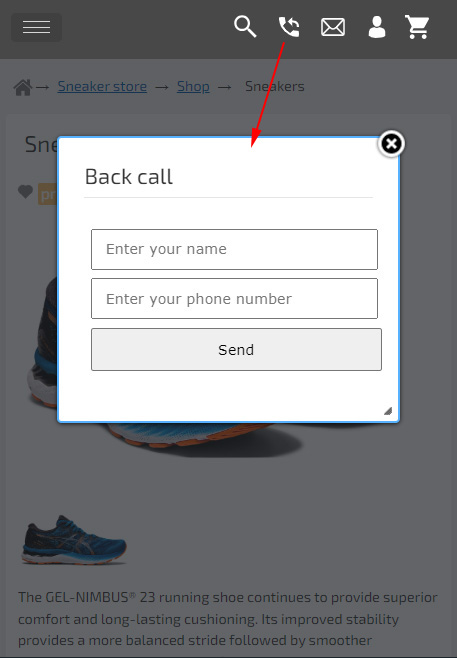
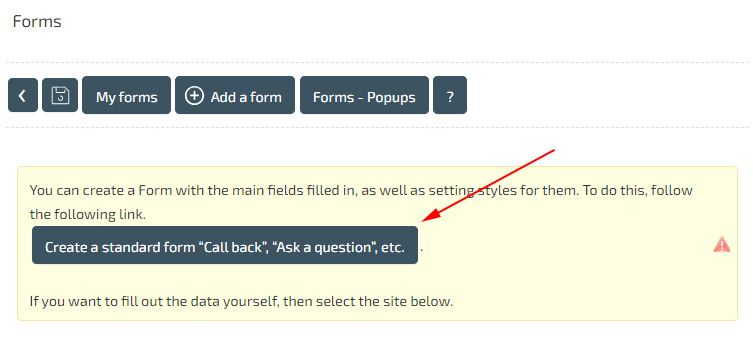
This can be done in the «My Forms» - «Add Form» section. In order not to fill out all possible fields and parameters, use the quick form creation by clicking «Create a standard form “Reverse call”, “Ask a question”».
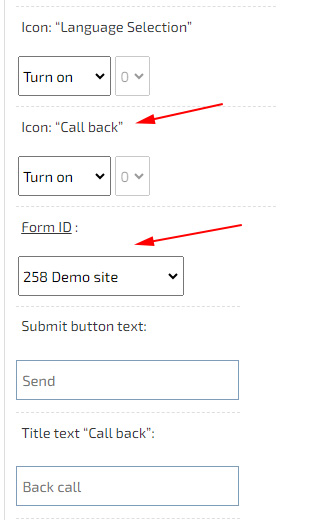
After that, in the mobile block, enable the desired button and specify the «Form» through which the data will be sent.
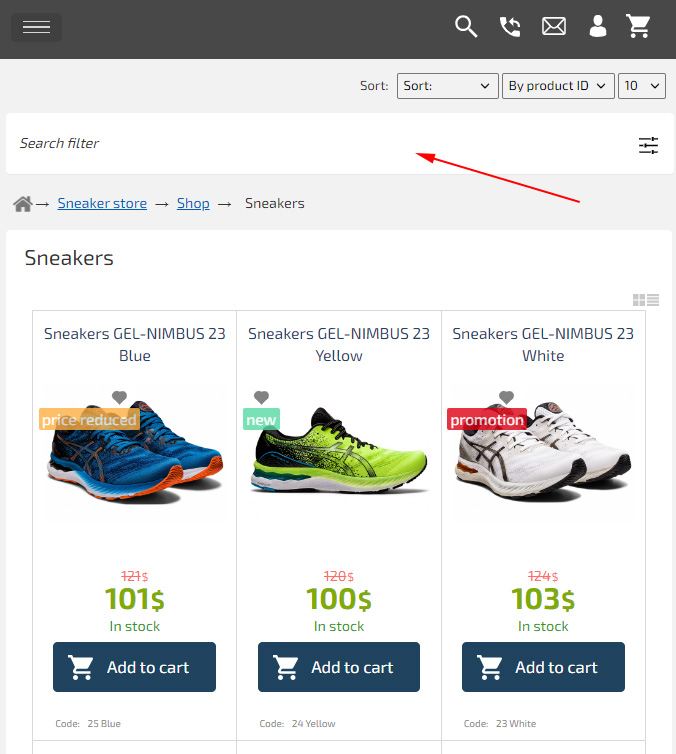
If the «Search Filter» block is installed on the page you are viewing, you can additionally add a «Search Filter» button in the mobile version. To do this, in the mobile block in the «Search Filter» tab, enable the «Add Search Filter Block to Content (above #hotengine-cat-tree)» option.
Widgets: List generator with categories and products.
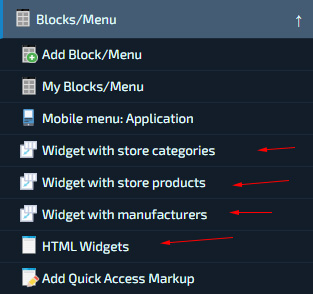
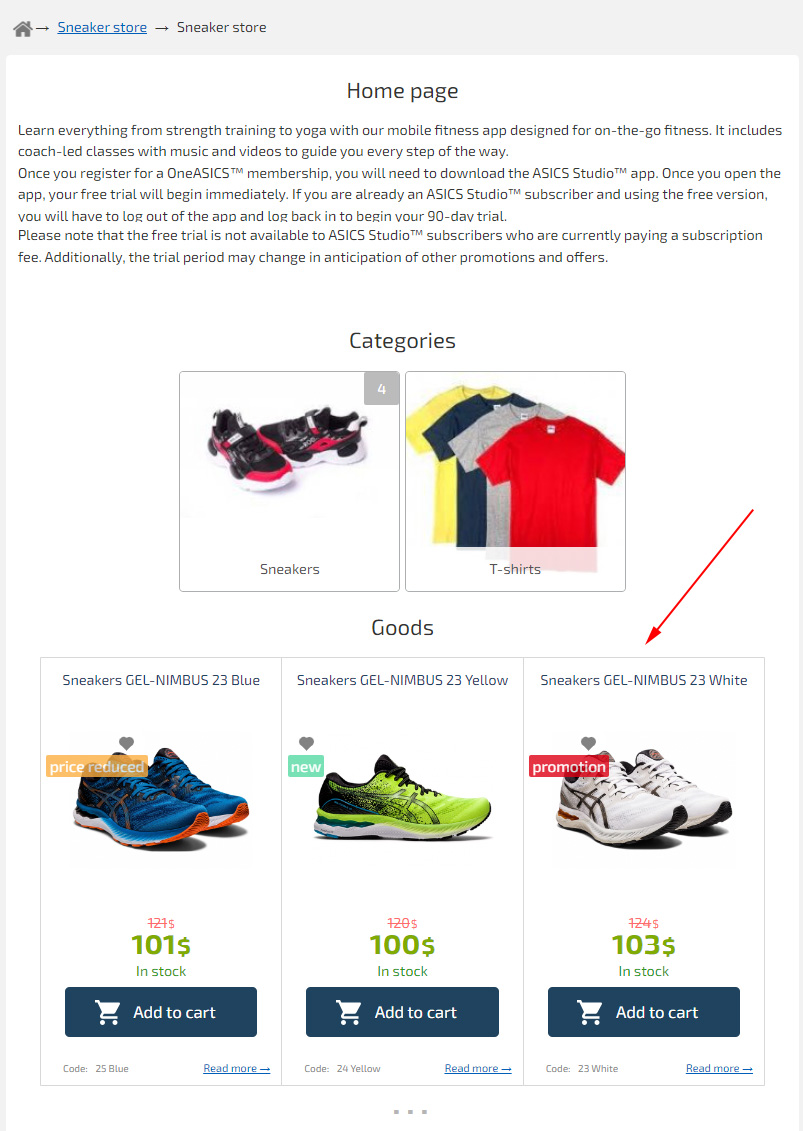
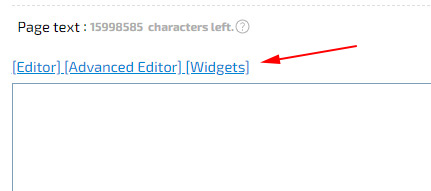
In addition to the standard display of the catalog with categories and products, you can create a special code to place this data on any pages. For example, let's create a page and place a «List of Products» on it. Use «My blocks/menu» - «Widget with products» or in the editor on any page, click «Widgets» - «Widget with products» and specify the necessary characteristics and display properties.
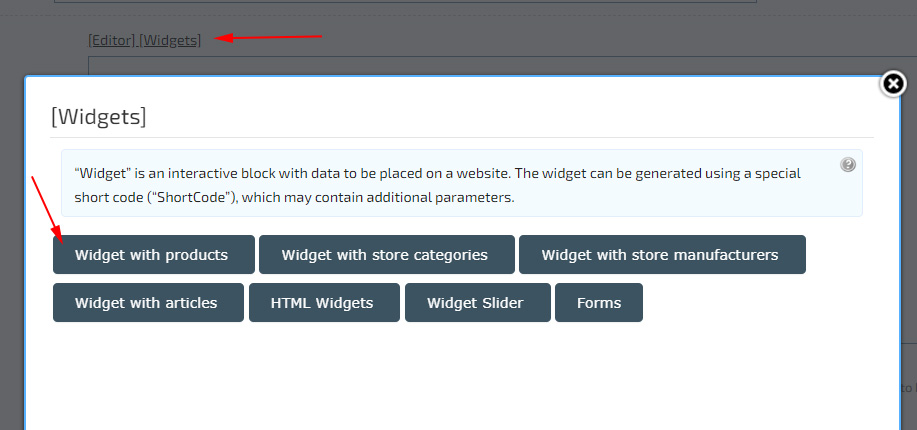
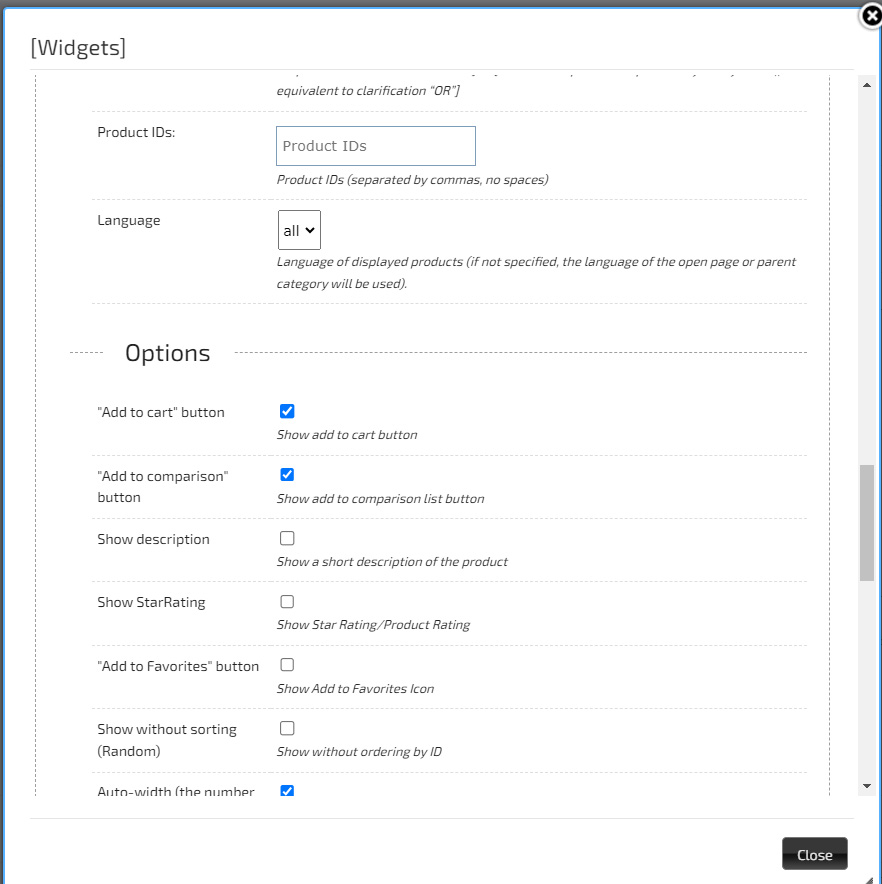
For example, you can display only «New Items», add a «Cart» and «Add to Favorites» button, specify the number of products displayed, and also change the options for adding the next products in the list (scrolling or the «Show more» button).
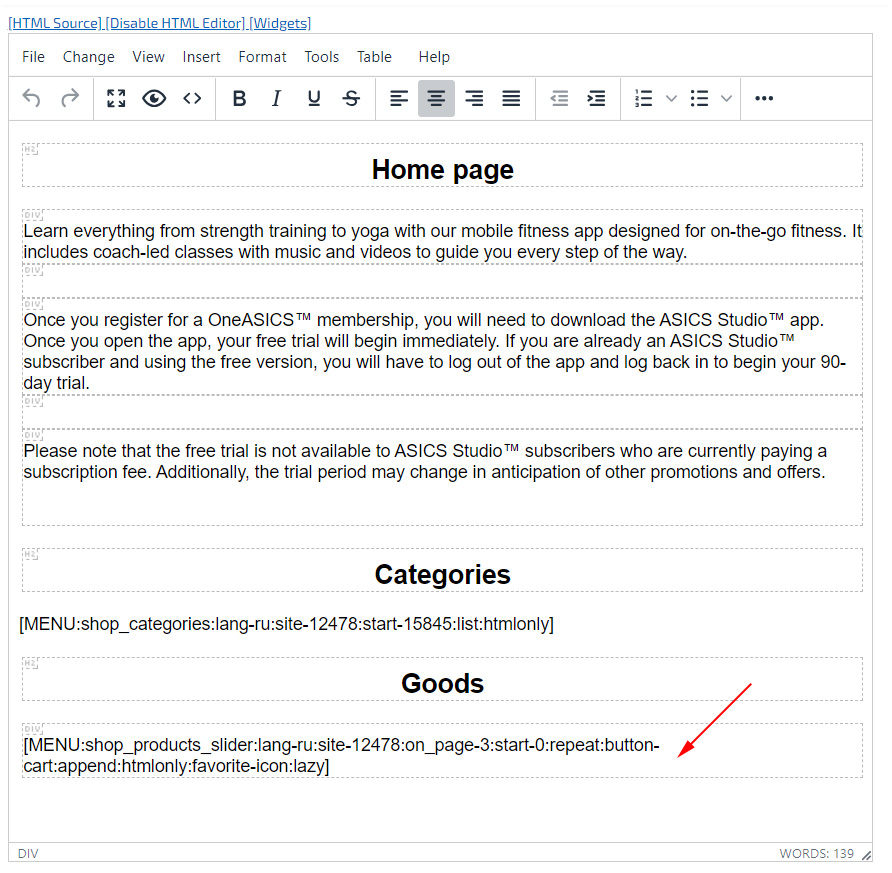
Creating a «Block/Menu» with drop-down items for store categories
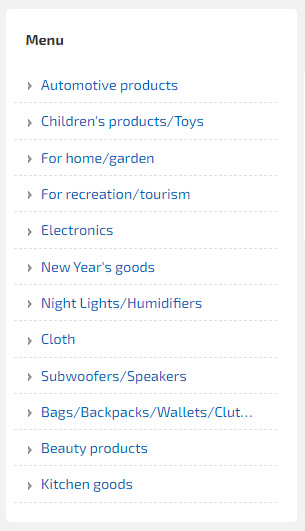
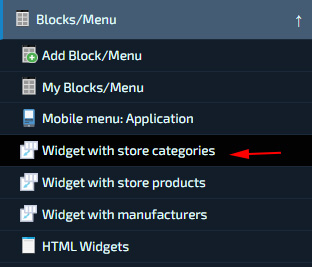
To create a list of categories and subcategories, add a «Block/Menu», place it, for example, «On the Left» and use the «Widget with store categories». Specify the parameter «:vertical - vertical menu» and paste the resulting code into the text of the «Block/Menu». For example, "[MENU:shop_categories:start-0:vertical:dataattr:googlenav:htmlonly]". Where start-0 – replace with the ID of your main category «Shop», for example, «start-123».
Shipping and payment.
You can add the ability to select delivery and payment methods, as well as connect payment systems.
Delivery
To create your own delivery methods, go to the Admin Panel section - «Store» - «Delivery». Use the instructions to create a shipping method. For example, let’s add delivery methods «Courier delivery» and «Pickup». Click «Select a delivery method in the order form» and add delivery terms.
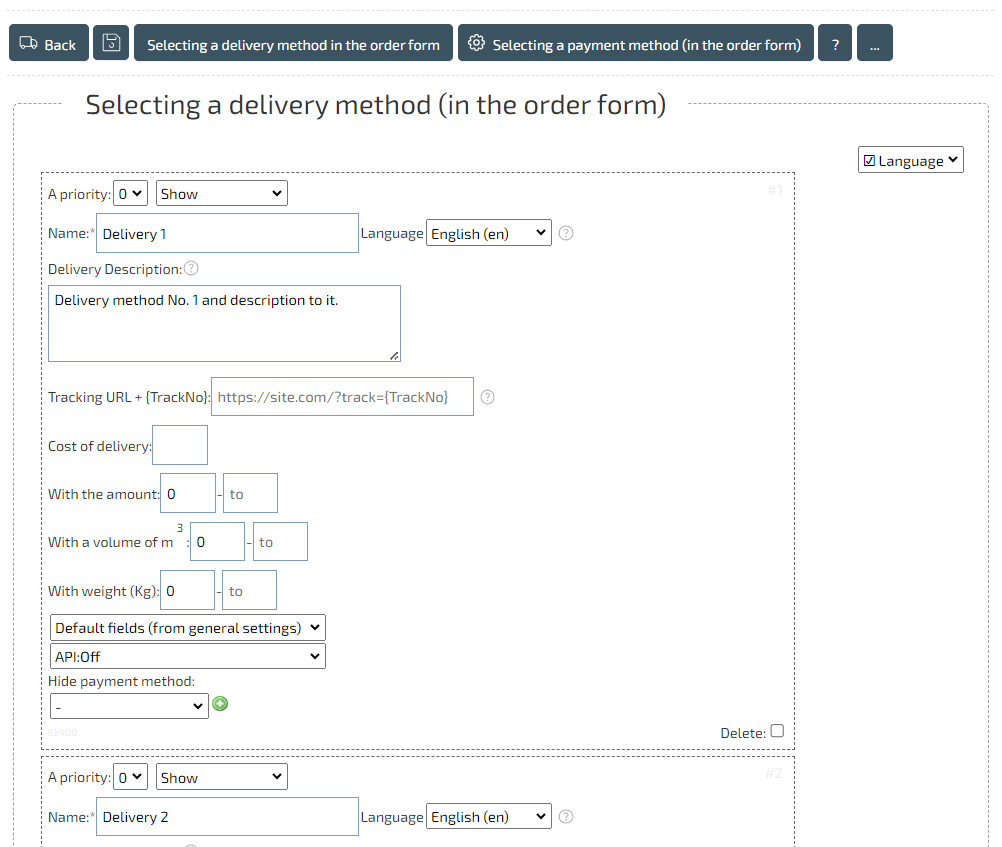
As a result, the buyer will be able to select one of the proposed delivery options, as well as receive a description of the conditions after changing the delivery method. Delivery methods can be added in different languages.
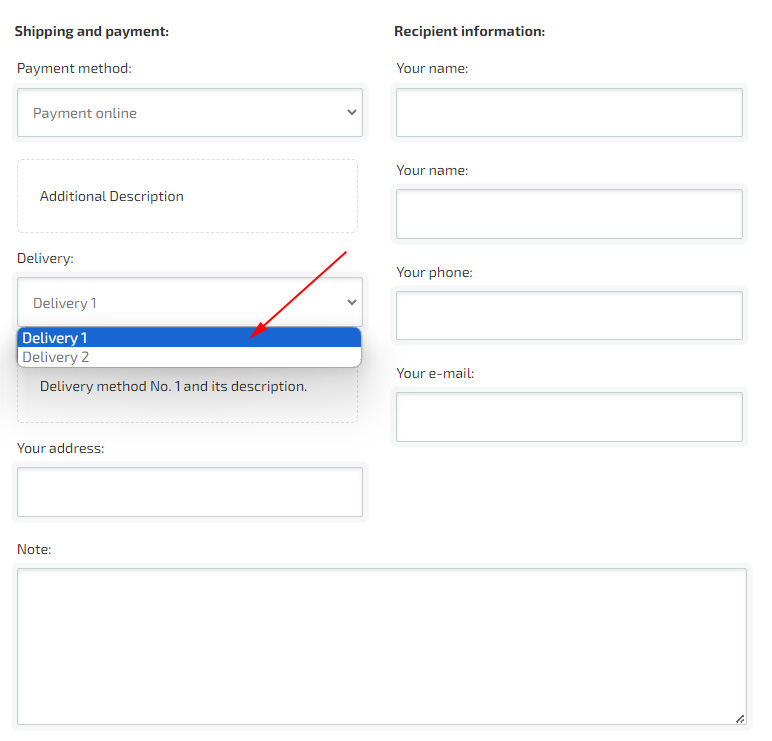
You can add a shipping cost when placing an order, set a dependence on the «order amount», add a shipping cost to each product individually (including the total cost for all products) or use an expanded version of the shipping method editor, divided into «Countries» ", "Regions" and "Delivery methods". More details in the «Store» - «Delivery» section.
Payment
You can add the ability to «select a payment method for the buyer» in the «Settings» - «Store» - «Currency and payment» - «Select a payment method (in the order form)» section.
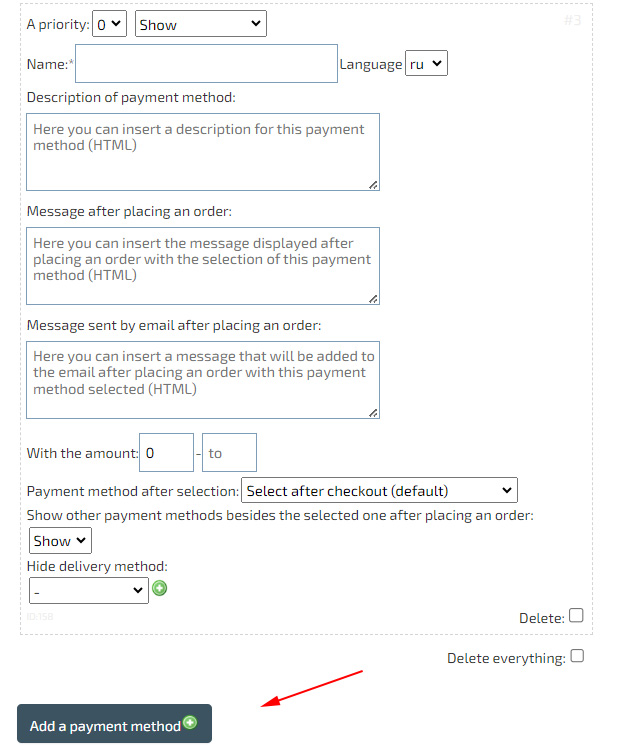
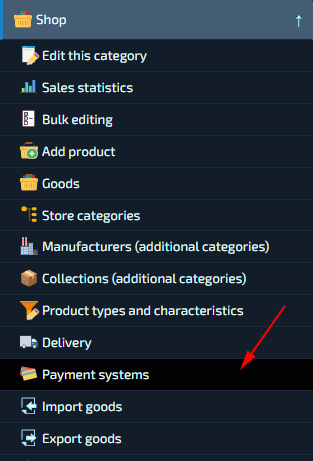
For stores created on the Hotlist.biz platform, it is possible to connect «Online Payment» - «Payment Systems». Additionally, it is possible to carry out «Payment for an order after verification», «Payment for an order using the selected method», «Payment if the buyer follows a specific link», «Payment via a link» - «Generating an invoice for payment without goods». Those. for example, you will be able to enable payment for a specific order only after checking the availability of goods, or only with a certain payment service. Instructions for connection and management are located in the «Store» - «Payment systems» section.
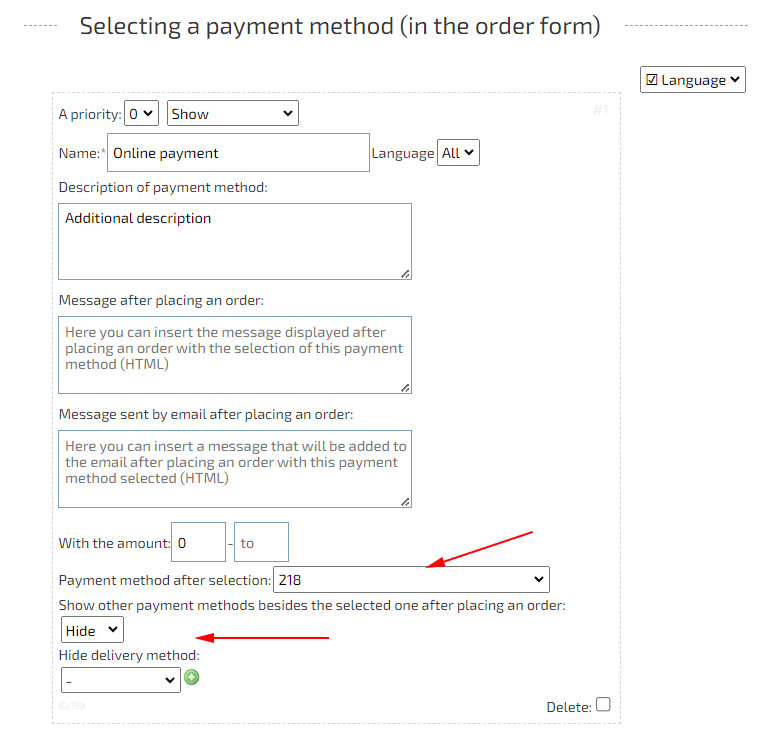
You can specify a specific payment system for the payment method, as well as add a note.
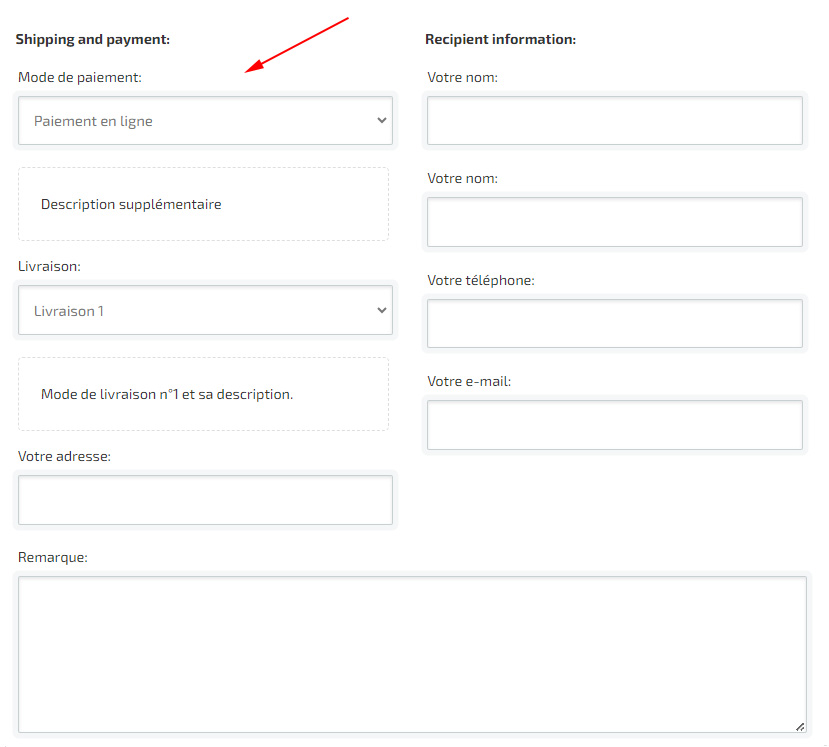
In addition, you can «Enable/Disable» the ability to select a payment method after placing an order. By default, the buyer will be able to choose any of the included payment methods.
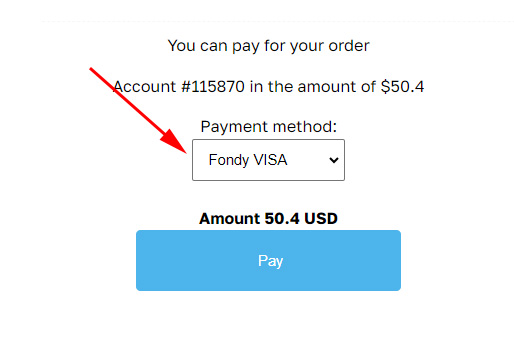
If you want to select a payment method at the checkout stage, then in the «Settings» - «Store» - «Currency and Payment» tab, in the «Select a payment method (in the order form)» add a payment method and in the parameter «Payment method after selection» indicate the desired payment service. «Show other payment methods besides the selected one after placing an order» - «Hide.»
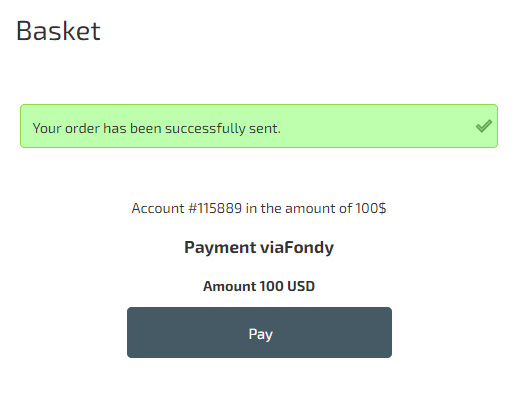
As a result, after placing an order and selecting a payment method, the «Pay» button is immediately displayed to the buyer.
If order verification before payment is enabled, you will also be able to force a payment method if necessary.
Enabling Payment after checking the order
The parameters «Enable/Disable order payment only after verification» are located in the «Settings» - «Store» - «Currency and payment» - «Payment methods» section.
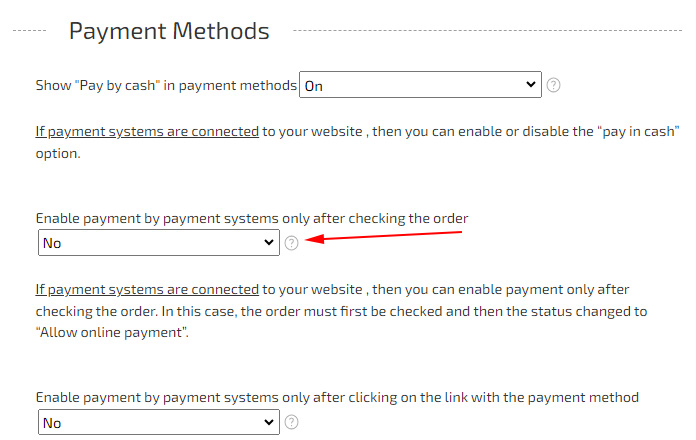
If payment is limited, you can enable payment for the order in «Sales Statistics» by opening the order and changing the parameters of the payment method, indicating «Allow payment by online payment system.»
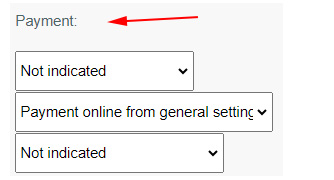
Payment systems
On the Hotlist.biz platform it is possible to connect the following payment systems: Stripe.com, fondy.io, Wayforpay.com, Monobank.ua, LiqPay.ua, Web.Money,
PrivatBank.ua,
And others...
To connect payment services, go to the «Store» - «Payment systems» section.
Single currency
You can set a single currency for the entire site, with automatic exchange rate conversion.
If you added a product in «EUR», and you need to display the price in another currency, then in «Settings», in the «Store» - «Currency and Payment» tab, enable the «Single currency» item. The default currency will be the one specified in the «Primary currency» item.
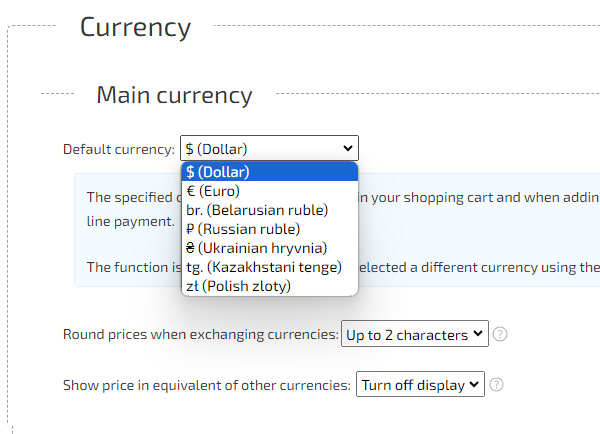

In this case, regardless of the specified currency in the cost of the product, a single currency will be displayed for the entire site.
You can specify the exchange rate in the «Currency rates» item.
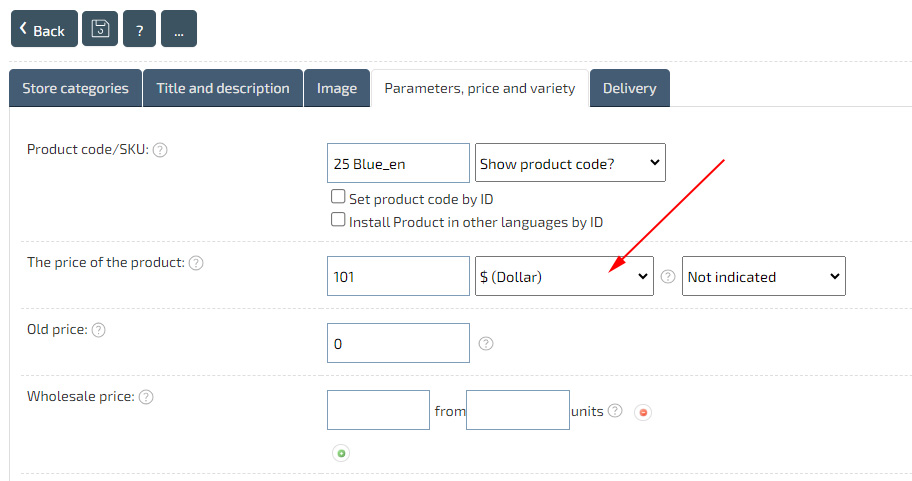
For example, the specified cost in «EUR» is automatically converted into the specified «Base currency» - «USD».
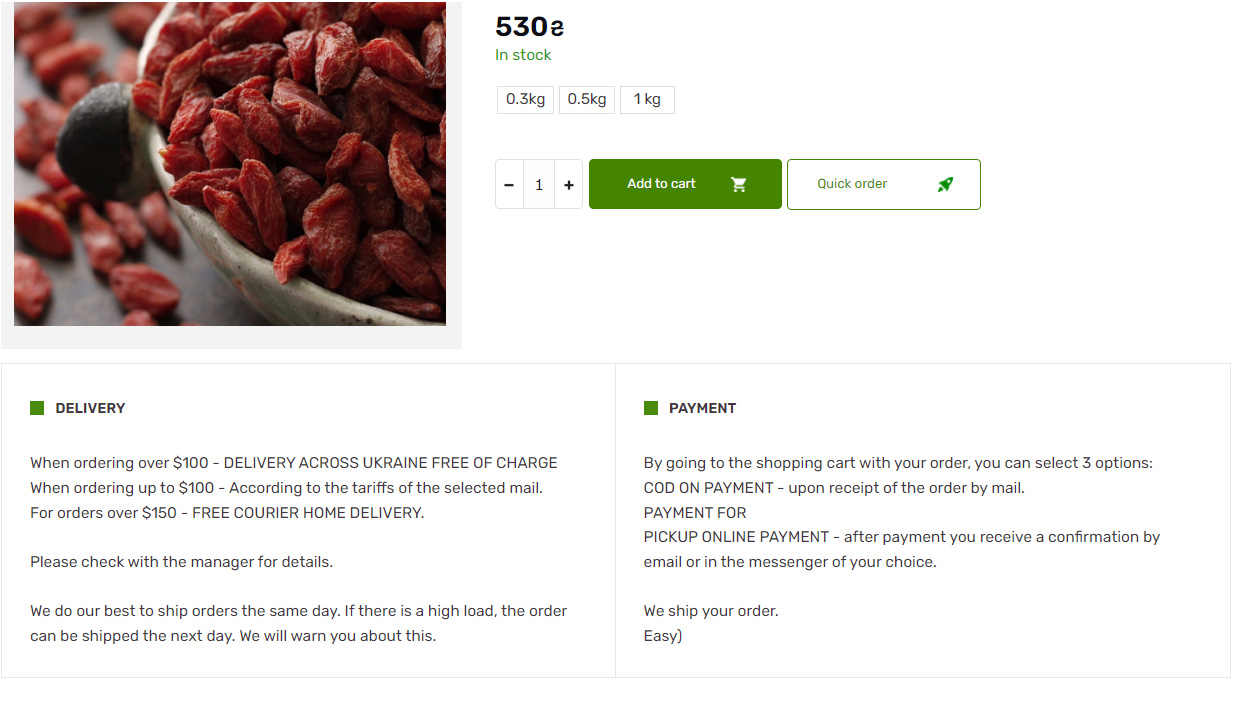
Adding delivery information to product cards
There are several ways to create delivery descriptions for product cards.
You can specify general descriptions for all products, create an individual delivery description for each card, or create a multilingual information block.
How to create an information block about the delivery method?
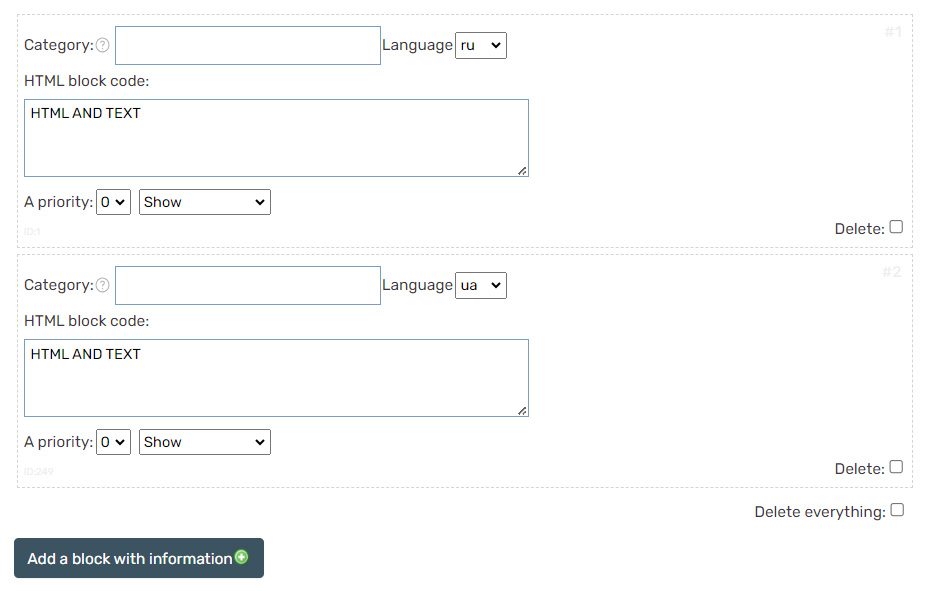
Go to «Settings» - «Store» - «Product View/Tabs». In the «Additional block with information in the product card» item, click «Enable» and in the block that appears, click «Add block with information». Specify the required language and text for the block.
In it, you can specify both display in all categories, and only for certain categories, by filling in the «Category» item - the name of the desired category. In the example above, payment information has also been added to the block.
How to create a general description of delivery methods, and also place it in a tab?

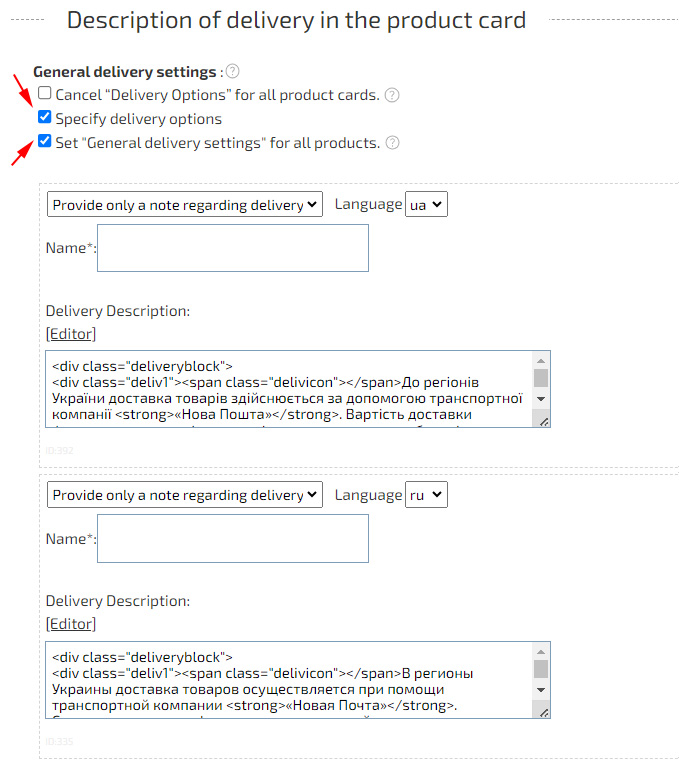
Go to «Settings» - «Store» - «Delivery» and in the «Description of delivery in the product card» checkbox «Specify delivery parameters».
Fill in the delivery information in the «Notes regarding delivery conditions» section and check the «Set "General delivery settings» checkbox. to all products" so that the display of "General notes" is set to all product cards.
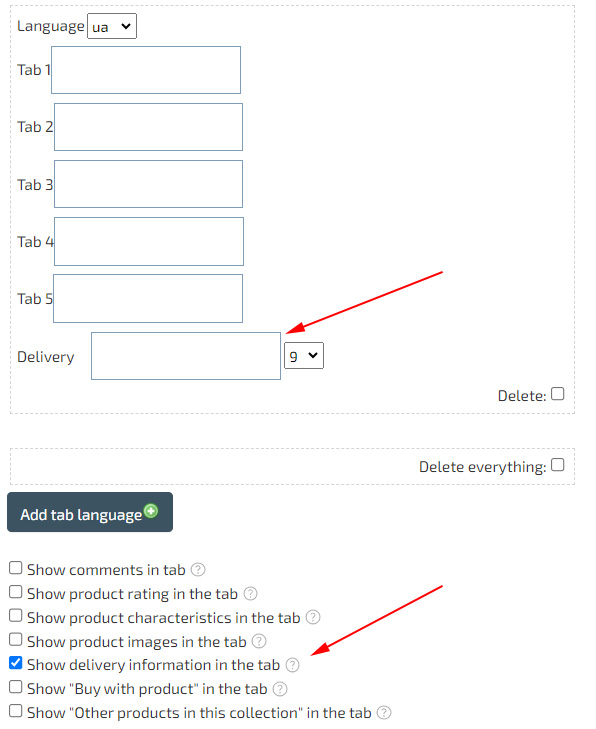
In order to display delivery information in «Tabs», go to «Settings» - «Store» - «View product/Tabs», and in the «Tabs with additional description» checkbox «Show information» about delivery in the tab." In this case, specify the serial number of the tab, for example, «9», to display the tab to the right of the other tabs. Similarly, you can enable the display of «Reviews» in the tab. You can specify your own «Tab» names by clicking «Add tab language.»
How to add individual delivery descriptions to product cards?
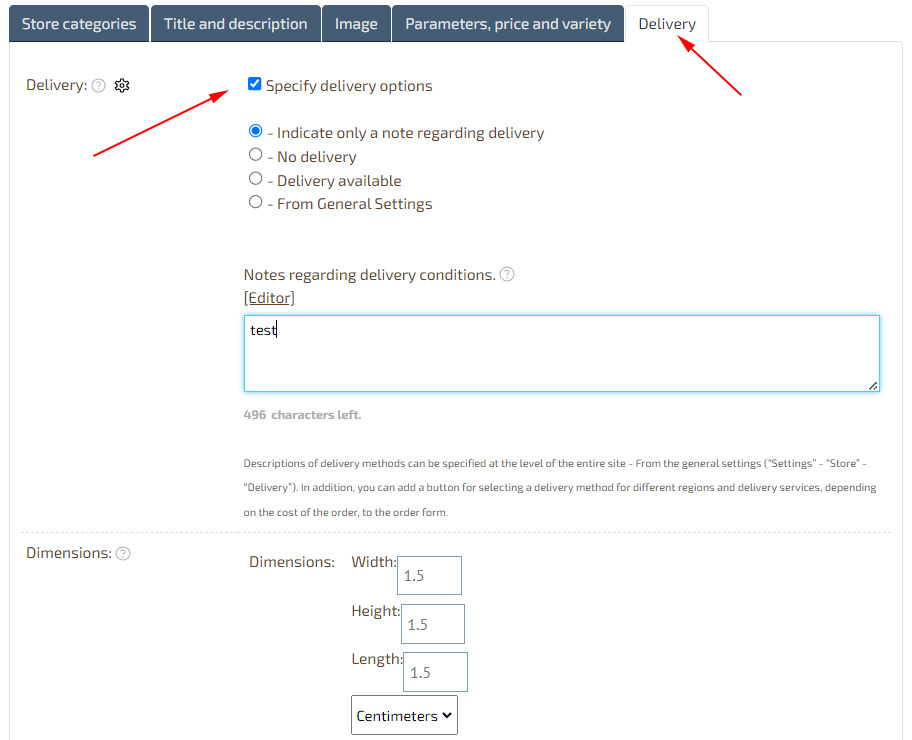
If you need to specify individual delivery parameters for some products, and you have already specified a general description for all cards, then when editing the product card in the «Delivery» item, select «Specify delivery parameters» and uncheck «From General settings», fill in required description for delivery. If the general delivery parameters are not specified, then similarly indicate the delivery information without checking the «From General Settings» checkbox
How to import goods? CSV/XLS/XML
The Hotlist.biz platform allows you to quickly import an XLS/CSV/XML file.
If the product supplier provides «XML/YML» uploading of its price list, then you can use «XML/YML file converter", as a result of which you will receive two files: «File with categories», «File with products». Perform import categories so that the products fall into the desired categories. After that, perform Import of goods.
How to import goods?
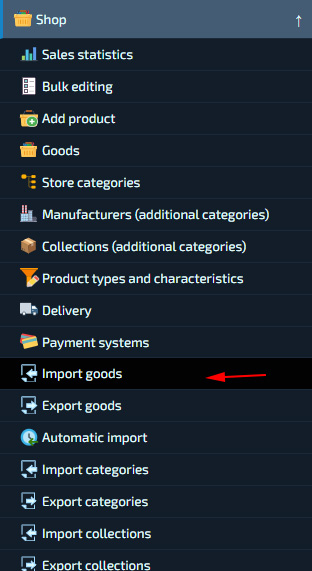
Go to the «Store» section - «Import goods».
Upload the «CSV» file and specify the cells to match.
For example, if the file has a cell «Article», then indicate opposite this line – «Article». Opposite «name» – «Name». Opposite each picture - «Link to image 1», «Link to image 2», «Link to image 3» and so on.
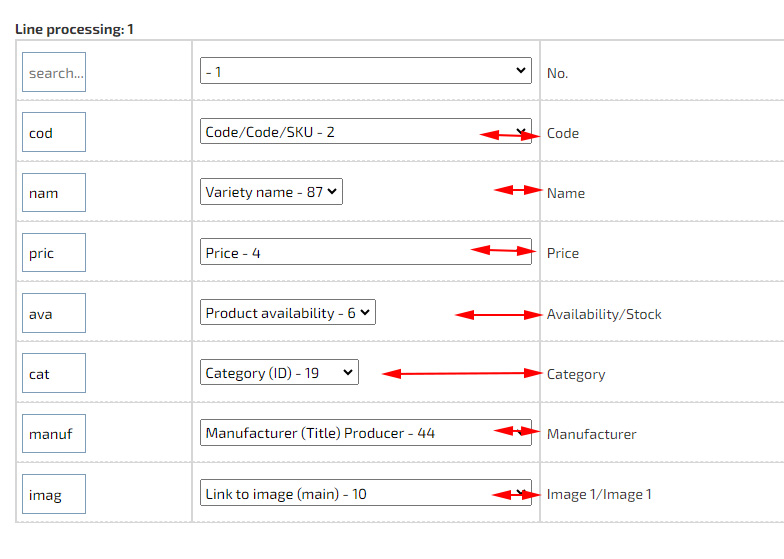
Selected cells can be saved by checking the «Remember field selection No. 1:» checkbox, after which, the next time you import, you can quickly fill in the cells by clicking «Fill the selection of match fields with previously saved values (Saved values No. 1)».
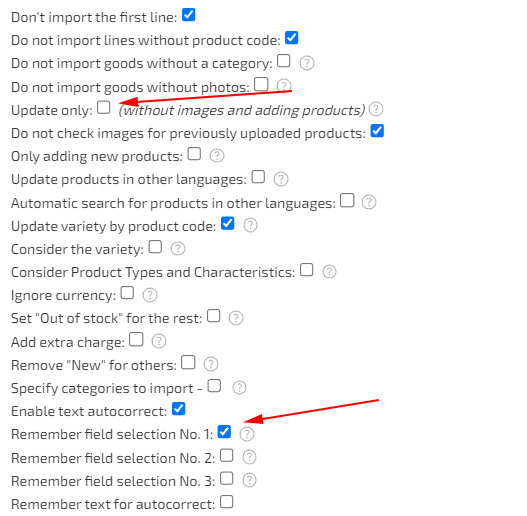
When importing new products, be sure to uncheck the «Update only» checkbox, since in this case new products will not be added and images will not be loaded. This option allows you to significantly speed up the process of updating products. For example, if you need to update «Availability» and «Prices», then it is enough to specify only the cells «Article», «Availability», «Quantity in stock» and import, leaving the «Update only» option. Be sure to check the compliance of the fields, and always indicate the «Article», so that in the future you will be able to perform an update with a check for the same «Article» and not create duplicate product cards.
On the product import page you can download an example file for download, or by performing «Export products» you can get an extended example file for import.
How to create a multilingual website?
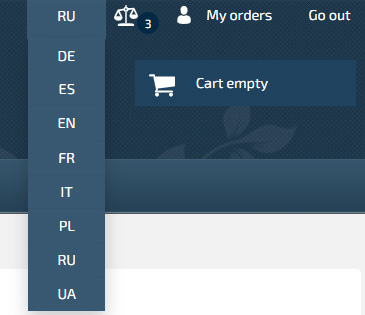
In order to add an icon for switching languages, just add the short code «{HOTENGINE-SC:langmenu}», for example, to the site header. In the site settings, in the «Languages and start page» tab, in the «Available languages» item, select all the necessary languages. When installing templates, you can also select several languages at once, and a short code will be added automatically to the site header.
In order to create a page in two languages, it is enough to indicate the same values in the «Page in other languages» item. For example, if you created «page1» with ID «123» in Russian, and «page2» with ID «124» in English, then in the values of both pages, in the item «Page in other languages» it is enough to set the value «123» .
You can do the same in articles, categories, and product cards. This code will make it clear to the search engine that this is a similar page in another language, and when switching languages, information about the initially opened page will be saved (i.e., when changing the language, a similar page will open in the language selected by the user).
< br>
When importing product cards in different languages, you can also use, for example, your Code/SKU/Product SKU in the «Products in other languages» field.
For each of the languages created on the site, you also need to add the corresponding menu blocks (header, footer, and others).
Detailed instructions for filling and replacing inscriptions
How to change Contacts on the site?
You can specify basic contact information on the «Settings» - «Change site description» page. By default, contacts appear on the About Us page. You can replace this page with your own by creating another page and deleting this item from the «Main Menu». The contacts specified in the header and footer must be changed in the «My Blocks/Menu» section.
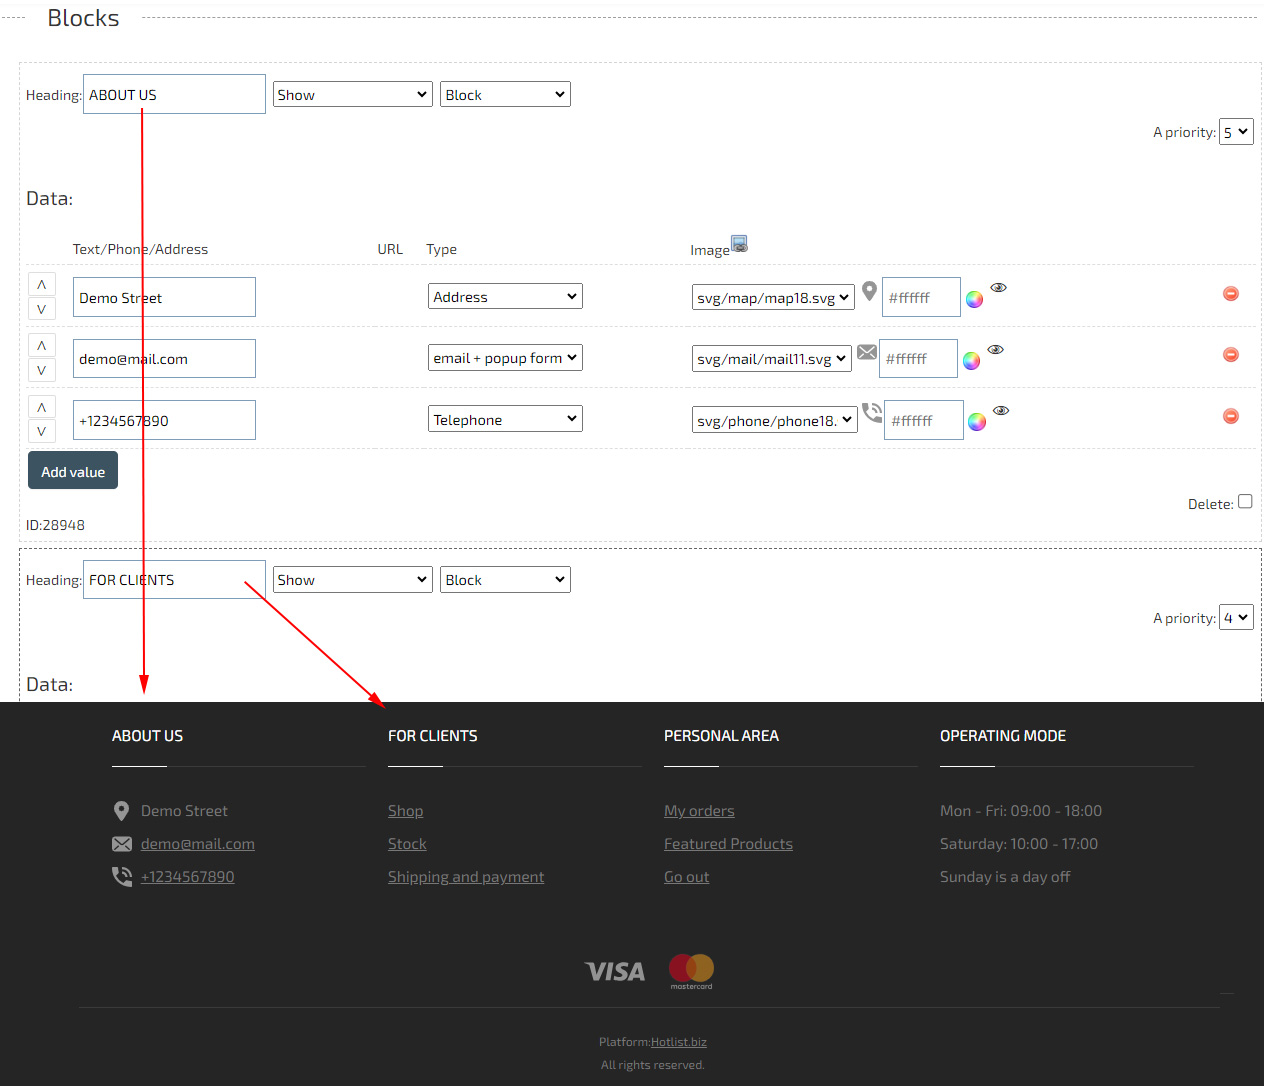
A simplified way to change contact information in the Footer (bottom of the site) is implemented using the «Footer_widget» widget. In which you can create or change blocks, specify contact information and icons.
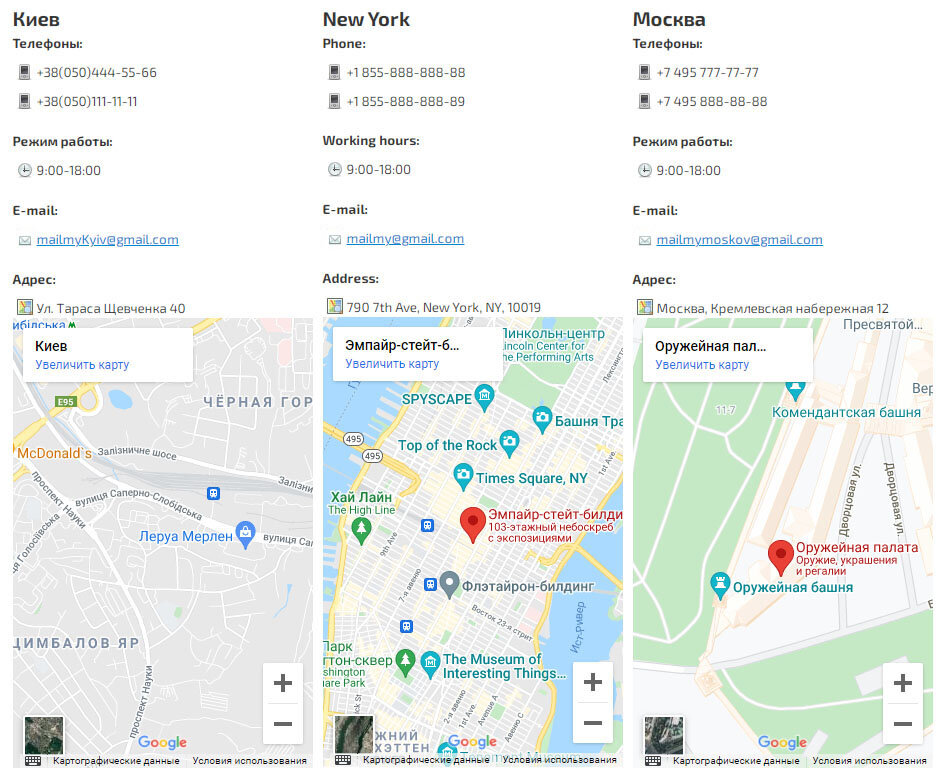
If you do not have the skills to create HTML design, then you can also use the «Contacts» widget, which can be inserted using the short code «{HOTENGINE-SC:contacts}». The code can be inserted on a page or in a Block/Menu. For example, you can create your own About Us page and place a contact widget shortcode on it. Contact Widget data can be changed in the «Pages» - «Contacts Widget» section.
Design Editor
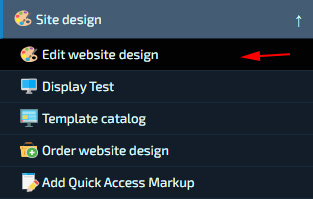
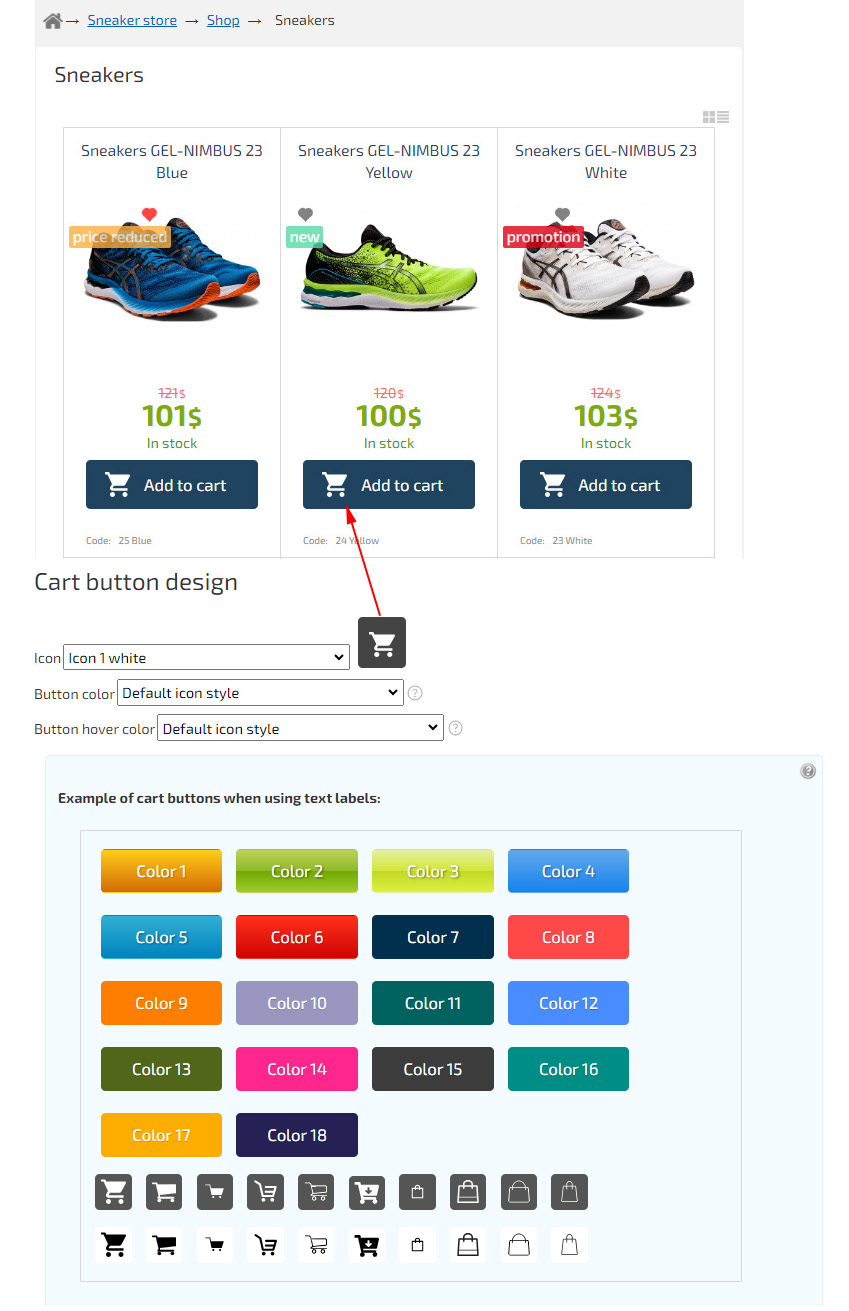
In the design editor you can set «Logo», «Header background», «Site background», «Set colors of site elements», «Change icons», «Add to cart buttons», as well as create an individual style for any elements. The design editor is located in the «Site Design» section. For example, let's set the Add to Cart button icons. In the «Design Editor» and in the «Content» tab, go to the «Cart Button Design» item. Set the desired icons and save the changes.
How to create a custom design? Layout and creation of Blocks
You can use the templates «Universal Flex» as the basis for your website or create a new layout yourself. When using a template, first install it, and then open «My Blocks/Menu» and change the «Header» and «Footer» of the site. The header of the «Universal Flex» template contains a division into 3 lines, in each of which you can use «Left», «Central» and «Right» blocks. You can change site styles in the «Design Editor» in the «CSS Styles» tab. Download the CSS style of the created Template and paste it into the «Css styles» tab to modify it further. In the template style, you can also find and change the style of category blocks, product cards, buttons and other elements.
In addition to using a template, you can create your own «Blocks/Menus» yourself, for example: «Header», «Bottom - Footer», «Left» and «Right» blocks of the site. You can find the names of elements to change their style by inspecting the objects when viewing the site. Almost all basic elements of the site are labeled with the name «hotengine...». To create standard elements such as «Cart», «Main Menu», «Featured Products», as well as inserting variable data (for example «Category Name», «Product ID» and others), use «List of values for automatic replacement", which can be found under the main text field in the block/menu editor.
Instructions:
- Main site modules
- Main blocks of the site and ways to change the design
- List of values for automatic replacement
Notifications and sales statistics.
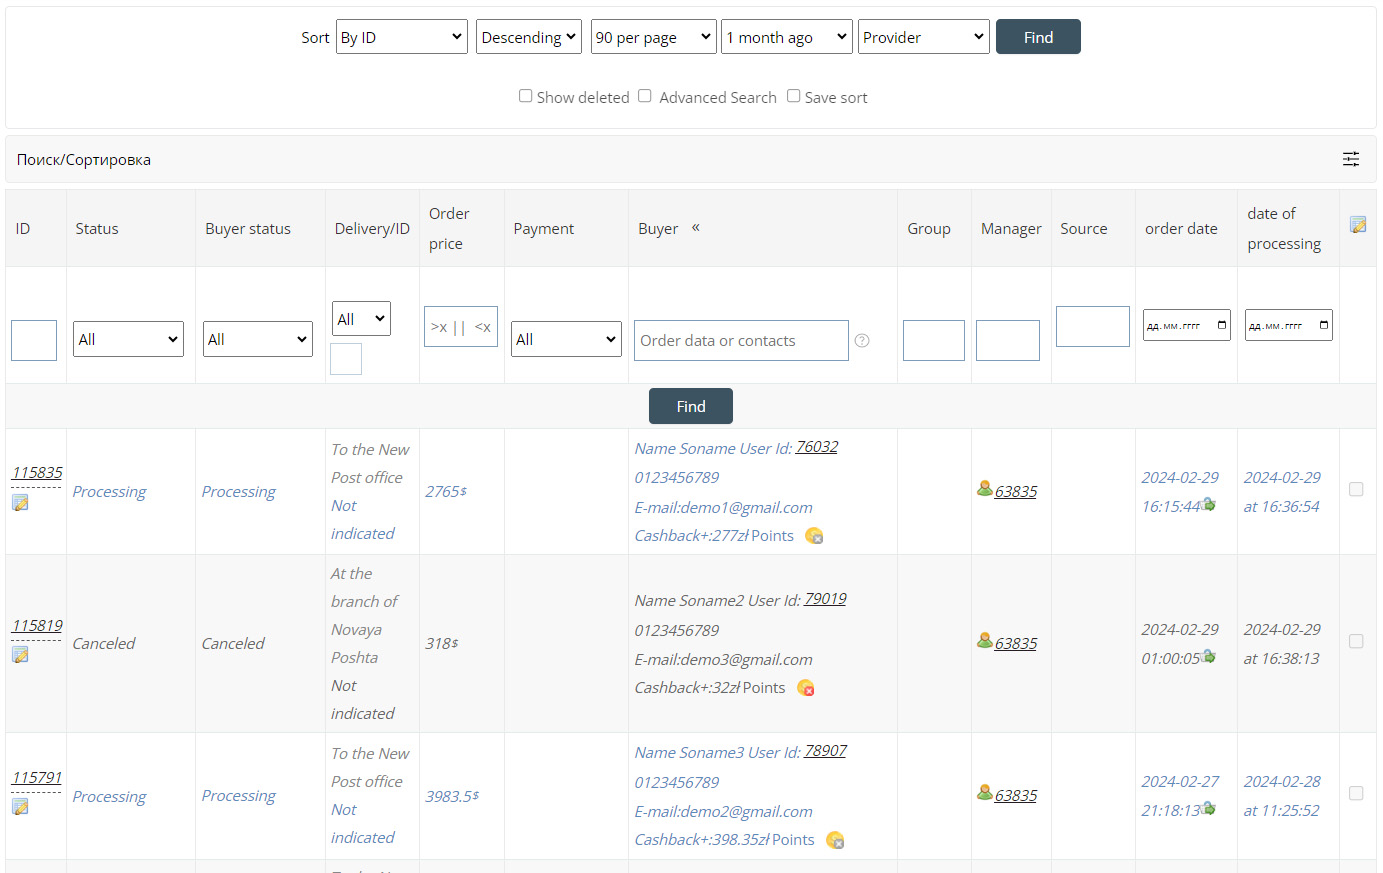
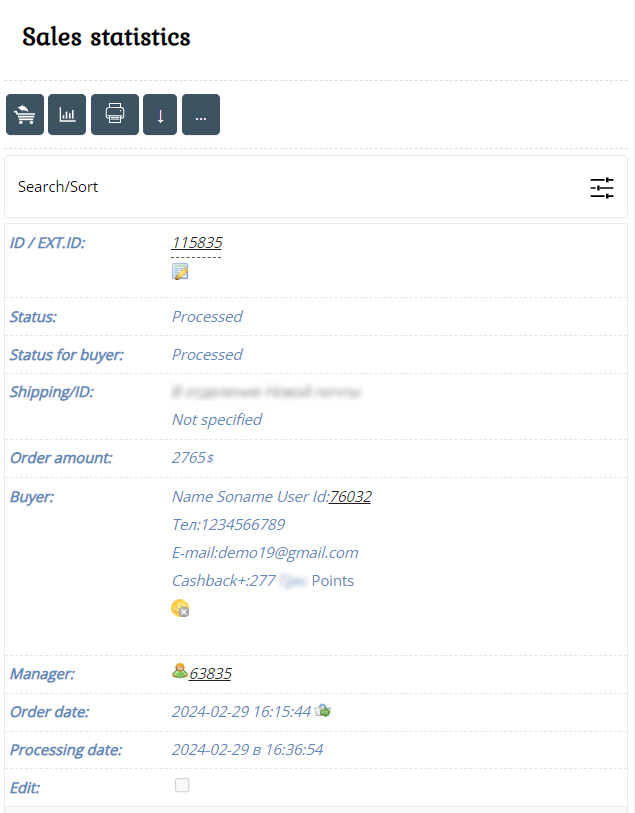
All orders in the store, or requests through previously created «Forms», will be sent to an email address and to sales statistics.
«Sales statistics» contains all the information about the order, and also allows you to change it, charge «Cashback», send «other product offers» to the buyer, track all orders of one visitor, change the status of fulfillment, payment and delivery...
Additionally, you can enable sending notifications to Viber or Telegram («Settings» - «Notifications»*). In addition, if necessary, you can configure automatic sending of orders to other sites or applications.
* - For previously created «Forms», such notifications are configured separately, in the «My Forms» section.
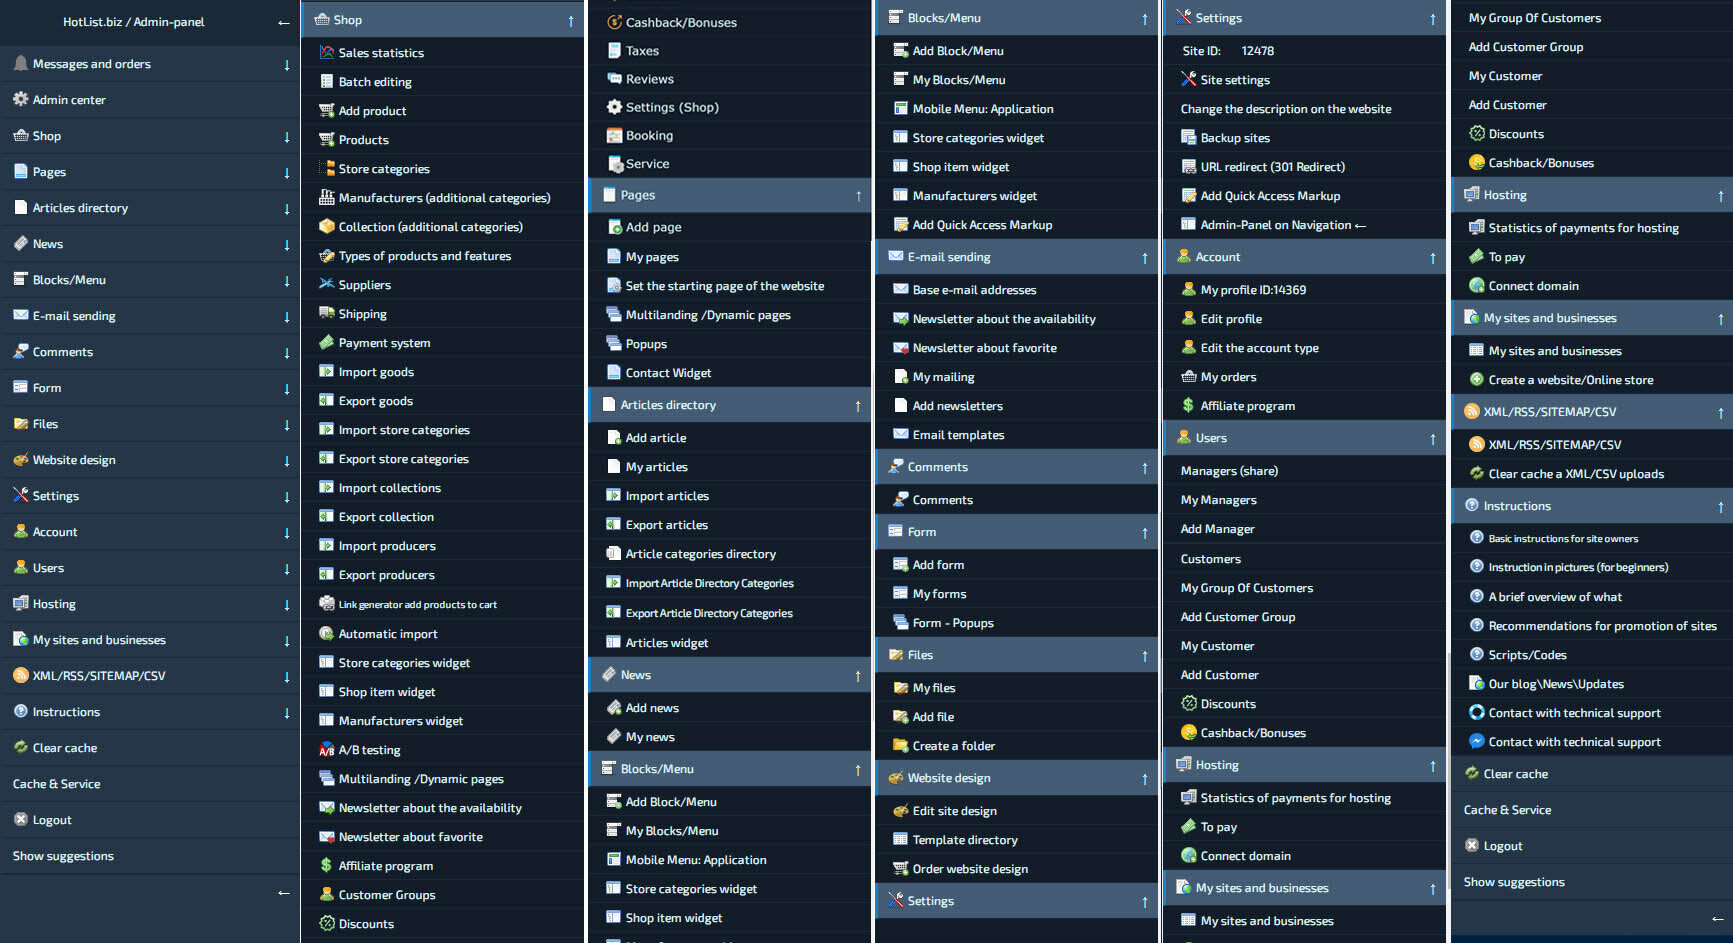
The platform provides a huge number of tools, including «Automatic updating» of your catalog from third-party sources.
You can add «Managers» with separate rights to implement multi-user access to site management («Users» - «My Managers»).
You can familiarize yourself with all the possibilities in the «Admin Panel» and on the page Instructions.
Domain parking
In order for search engines to immediately index your unique content linked to your domain (Site Address), you need to connect the domain. You can connect your personal first-level domain (for example: example.com) for free. The domain itself must first be pre-registered/purchased.After purchase, indicate our NS servers:
NS1.HOTLIST.BIZ
NS2.HOTLIST.BIZ
Or specify the IP address 88.218.28.193 in your domain settings («A» record).
Then contact us via feedback form to link the domain to your site.
You can connect payment systems or enable Google Merchant or Yandex-Market advertising only if you have your own domain name, because you must be the owner of the address. If you plan to use payment systems, then you must connect an SSL certificate. This can be done when paying for hosting.